When someone clicks on your author link, they will see all of your posts in reverse chronological order. This is a great portfolio to show prospective employers. (And you can bet that in these times, ed tech skills will be highly valued.) Here’s your chance to add one last post that will introduce your work to your viewer.
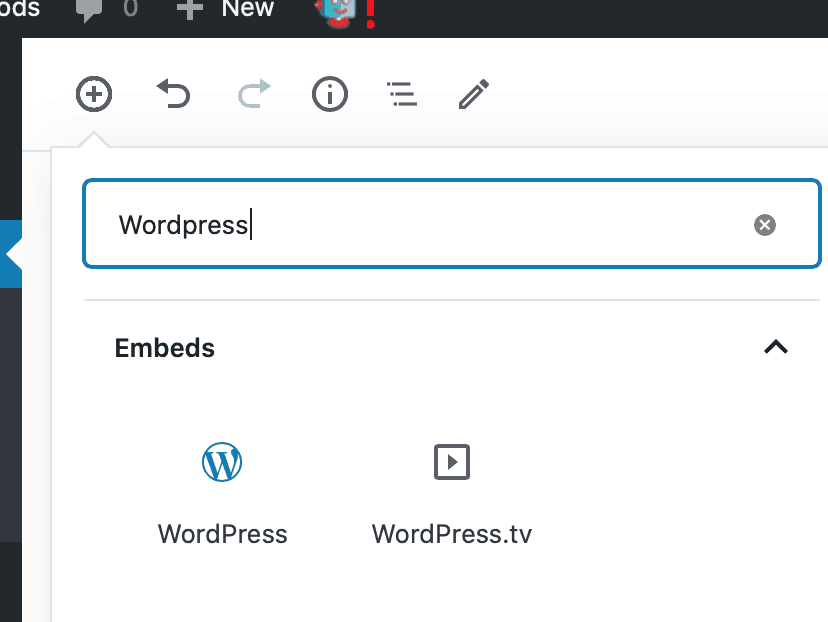
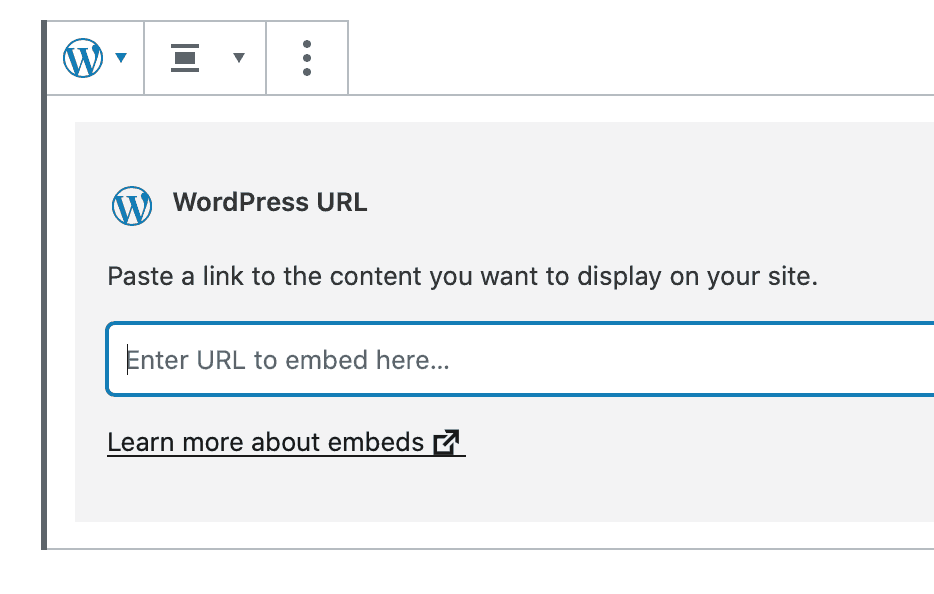
You can “illustrate” this post with a few of your favorite posts using a WordPress embed. To embed one of your previous posts, just add a WordPress block and add the URL of the post you want to add.
Your embed will look something like this. It will have your featured image plus the beginning of your post. It will also be an active hyperlink to the post.
In this class we will explore Book Creator – a simple tool for creating awesome digital books. Create your own teaching resources or have your students take the reins. Combine text, shapes, images, audio and video to make a book that can be viewed online or printed out. There is a paid iPad app, but you can also use the free online version in Safari or Chrome browser.
With a free account, you can get 1 library and create up to 40 books to use in your classroom. There’s no cost per student, and there’s no limit on the number of students that can join a teacher’s library. Also you can delete unused books and keep going.
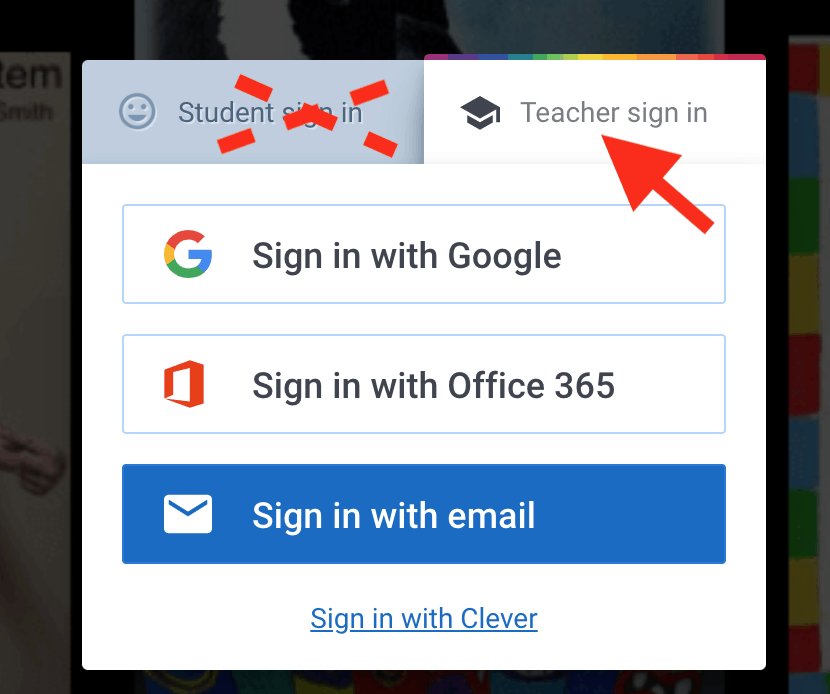
For this lesson, you should log into Book Creator Online and sign up for a free Teacher Account.
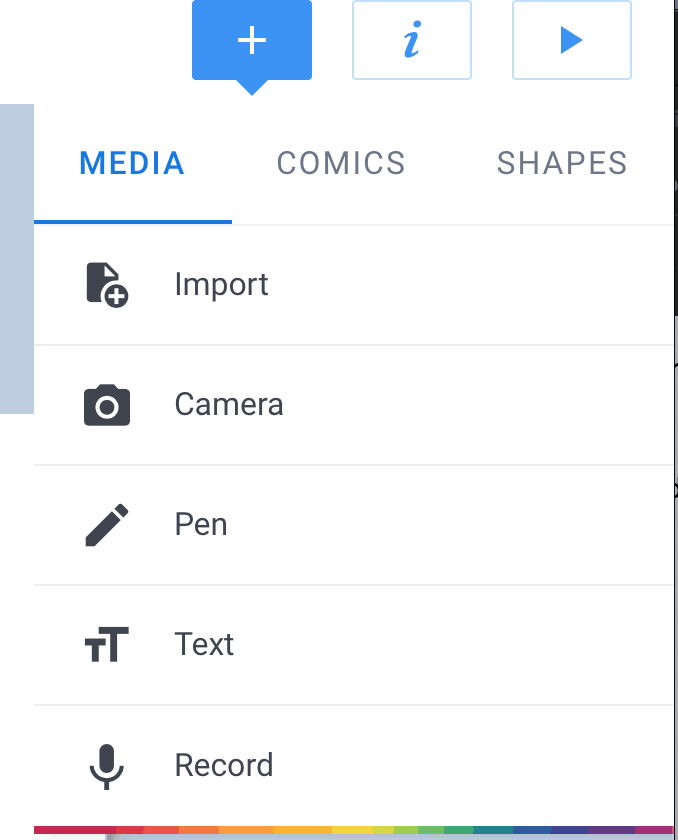
It’s a very easy app to use. Start a new book. I recommend always choosing a comic book, because it allows you to get comic elements even if you don’t use a comic book grid.Here’s a quick intro to adding media, comic, shapes and backgrounds for your paper.
Add media
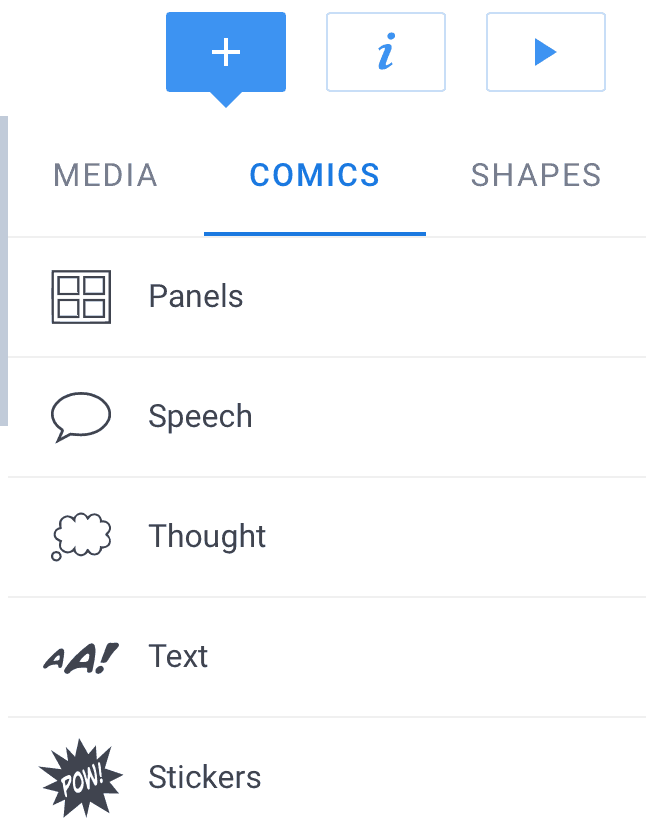
Choose to make a comic and get these extra options.
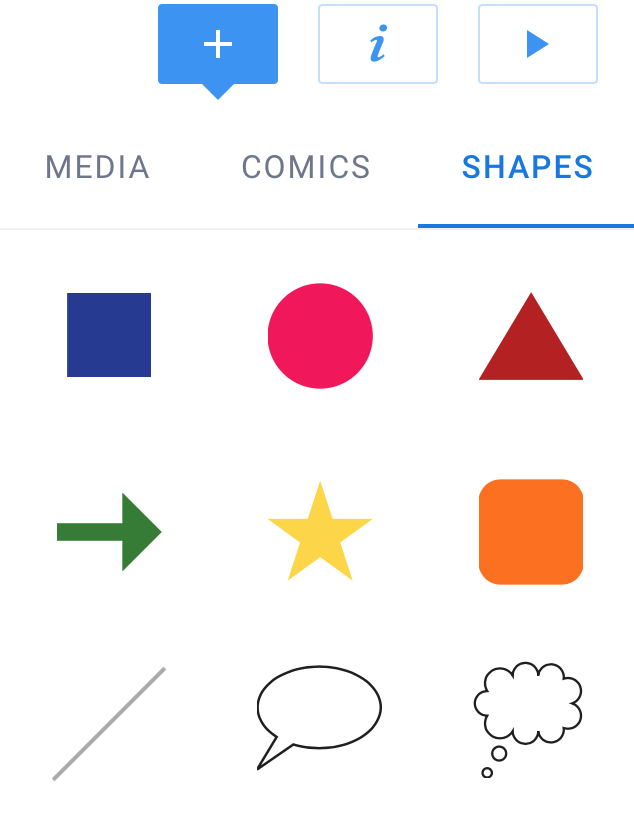
Add shapes
Click on page and get lots of backgrounds, borders and patterns
Use Book Creator to make a book and embed in your post. Your book could either be a resource for students to use or a model for books students would make or contribute to. Or you might want to make something to share with parents.
Embed your finished book into a WordPress post that includes a written description of the audience and purpose of your lesson.
As always, be sure to include a featured image and clever title for your post.
Resources
The video below takes you through how to add content to book, how to “publish” and get an embed code to use with HTML Snippets. Jump to 4:17 into video to see how to get embed code
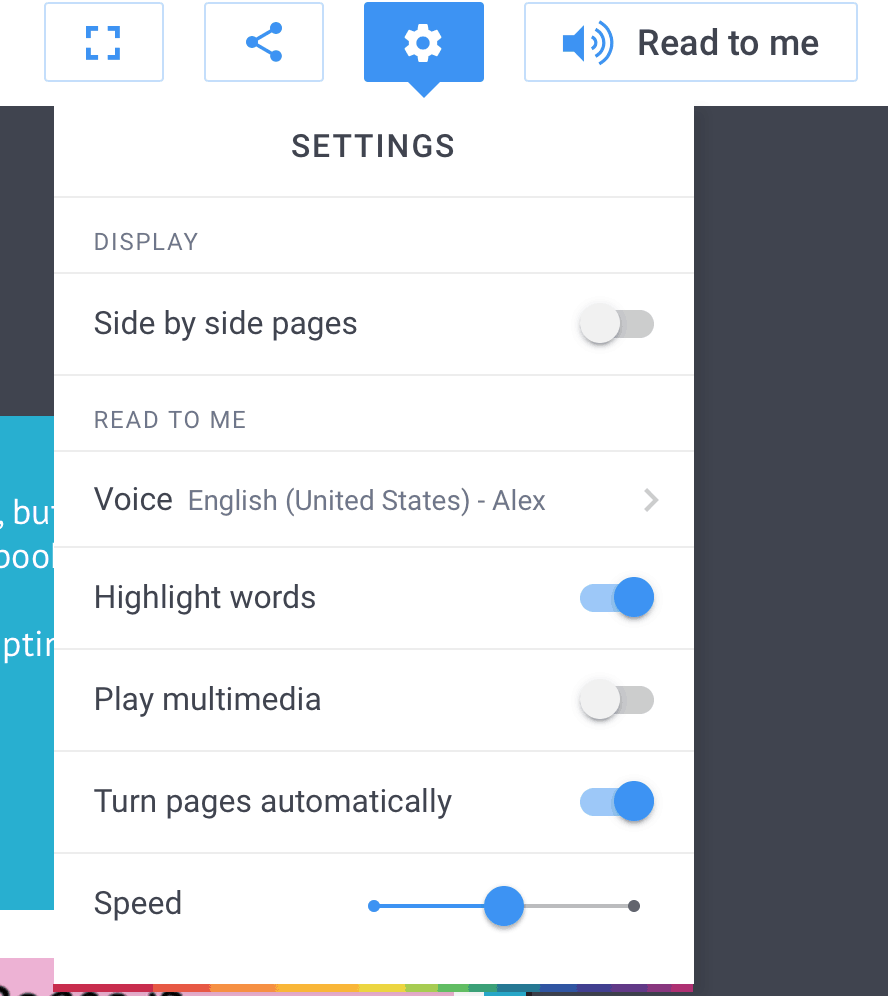
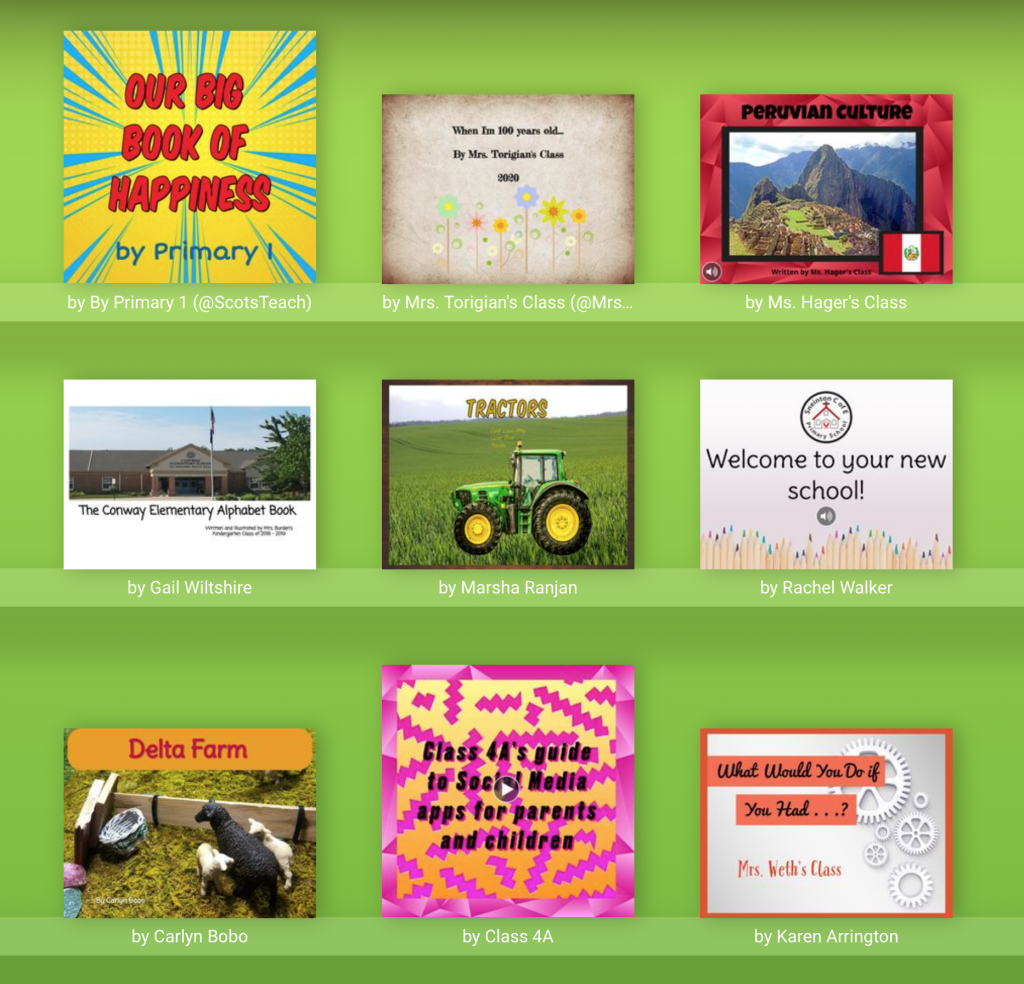
Below is a sample of an embedded book with lots of ideas. You’ll see how it displays online with page flips. Click on reading settings in upper right and you can see what a powerful learning tool this is.
You might remember our second class – “Teaching in the Digital Era”. It explored the skills we need to be “digitally literate in the modern world.”
Find, decode and critically evaluate information
Curate, store and responsibly share information
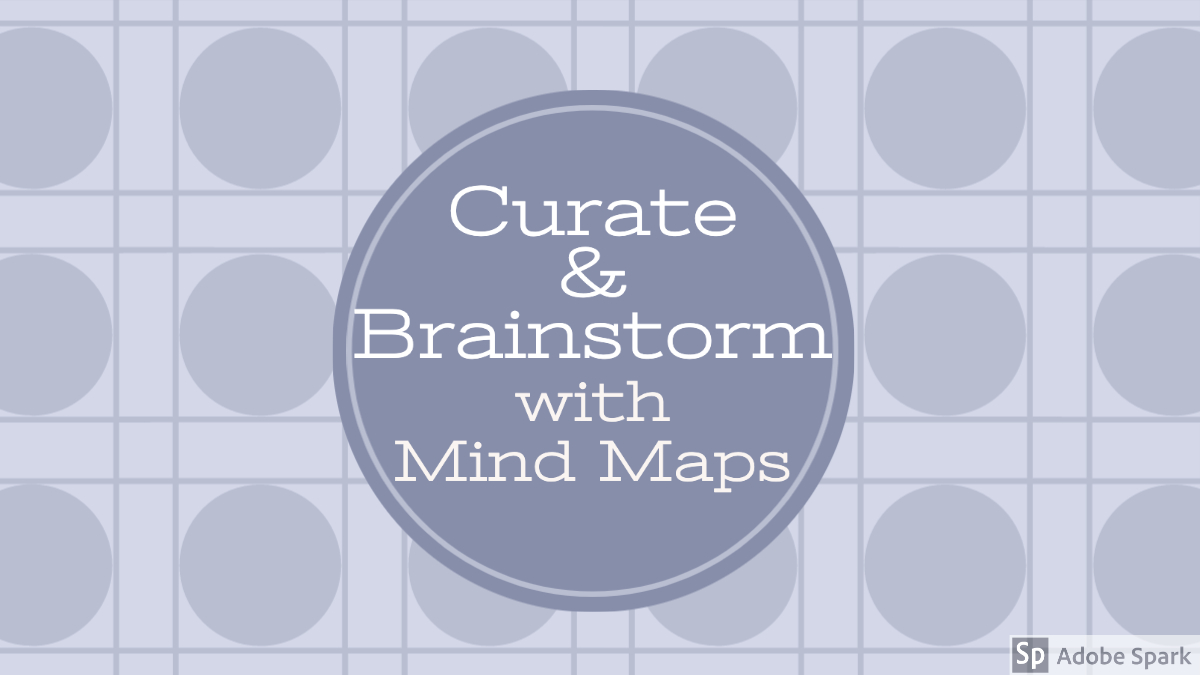
Today we will look at some tools to help you curate, store and share content in the form of a digital collection or mind map. Kind of like Pinterest? We’ll look at five curating / mind mapping apps. All are easy-to-use and popular with teachers and students who want to organize digital content in a visual layout.
I have added a link to a how to for each app, but I want you to be able to experience the learning curve of a new user. That means you may need to search for more support material to learn how to use. For example: you’ll have to figure out how to add content in an app or get an embed code for a finished collection. (You can always Google it or use the app’s help feature). And remember if an app is tough to use, its the app’s fault.
Here are the apps arranged from most full-featured to least. All have a free option and you will find a link to a how-to for each app.
Padlet – app that enables users to create an online bulletin board to display information on any topic. It has many options for types of information that can be collected. It’s great for curating information – either individually or with others. How to
Webjets – allows you managing any kind of information with ease. Place cards freely, or group them at the speed of thought. Any content collected from the web automagically turns into an interactive card. How to
Wakelet – Save your favorite content from across the web. Articles, videos, blogs, tweets, songs and more – bookmark anything you find online in two clicks. Arrange your bookmarks into stunning collections. Add images, text and organize however you like to build stories from your content. How to
Popplet – In the classroom and at home, students use Popplet for learning. Used as a mind-map, Popplet helps students think and learn visually. Students can capture facts, thoughts, and images and learn to create relationships between them. How to
Bubbl.us – A Bubbl.us mind map is a graphical representation of ideas and concepts. It’s a visual thinking tool for structuring information, helping you to better understand, remember and generate new ideas. How-to
Decide what your criteria are – for example ease of use, or collaboration features.
Write a review that details why you preferred that app.
Include an example of something you created using each app. It could be the same content for comparison sake. Decide if the app provides an embed code to use with HTML snippets or take a screenshot and use it as hyperlink (we did the latter with Google sites lesson 6.)
Include at least one idea you have for using your “fave” with students – either to deliver content to students of for them to use the app to curate their own content.
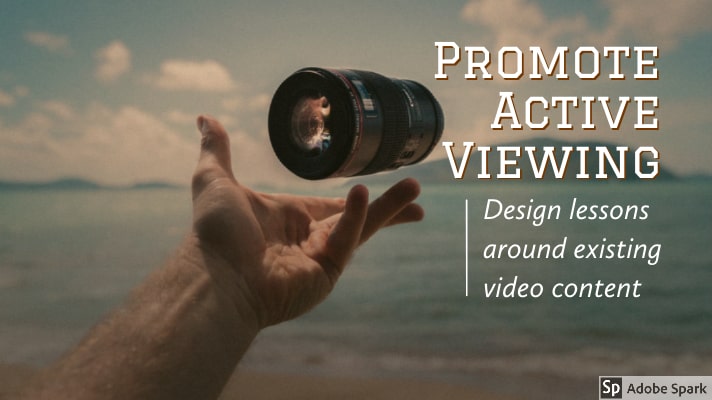
This week our focus will be designing lessons around existing video content. There’s so much video content out there , but you need to help students truly interact with the video content, rather than passively consuming it.
First – take a quick look at ViewPure – share video content with students without related sidebar video suggestions. Click here to “purify” a video. This is a great tool to shelter your students from nasty YouTube content that may only be a few clicks away.
In this lesson we will use EdPuzzle. It’s a free web-based tool that you can use to pick a video, add your magical touch and track your students’ understanding. It allows you to add questions, audio and notes to existing videos from Y ouTube, Khan Academy, Crash Course and more. If you’d rather record and upload your own video, go for it!
Create a free teacher account at EdPuzzle. Follow these steps to create an account, a test class, and make content
Be sure to leave a comment below as proof of “attendance” during regular class time.
A lot of a teacher’s time is spent explaining things to students – typically by talking to them. But teachers can create short videos to explain things that otherwise would need to be repeated. In this class, we’ll look at a few ways to “automate” explanations with video.
Edtech guru, Kathy Schrock defines screencasting as “the capture of the action on a computer screen while you are narrating. Screencasts can be made with many tools and are often used to create a tutorial or showcase student content mastery.” A related practice is sketching out a lesson with drawings and make a video using your smartphone.
HERE’S A FEW TIPS FOR VIDEO CREATION:
Keep it simple. Think of audience and purpose.
Keep it short. Why make students sit through a long how-to?
If you can, use a plug in mic (just a standard smartphone earbud mic works well). Do a quick test to check the volume level and mic position first to get sound level right.
Practice a few times to find efficient ways to demonstrate and describe what you’re doing.
If you will be entering much text as part of the task, I create a text document first so I can copy/paste text into what you’re demonstrating ( I hate watching videos of people typing.).
Two OPTIONS FOR CREATING VIDEOS – THERE ARE MANY MORE
Option 1: Use an app to capture a video screencast of what is on your screen.
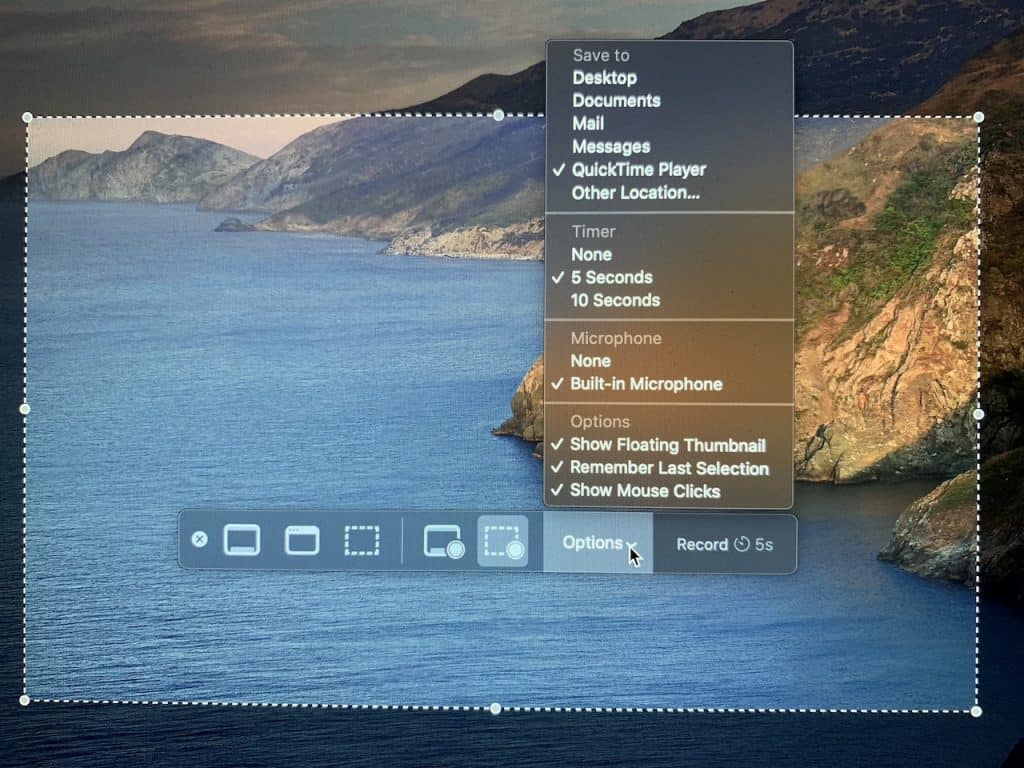
There are many apps that can do this. Most of you have Macs. So I’ll go into detail on Quicktime Player, which is built into the Mac OS. It’s easy to use and quickly uploads to your YouTube account.
Another screen capture option is Loom – a free Chrome browser plug in. To get Loom open your Chrome browser and get the Loom extension here. Or you could turn a PowerPoint or Apple Keynote presentation into a video with narration. How to here.
This video shows an older Mac running Quicktime Player.
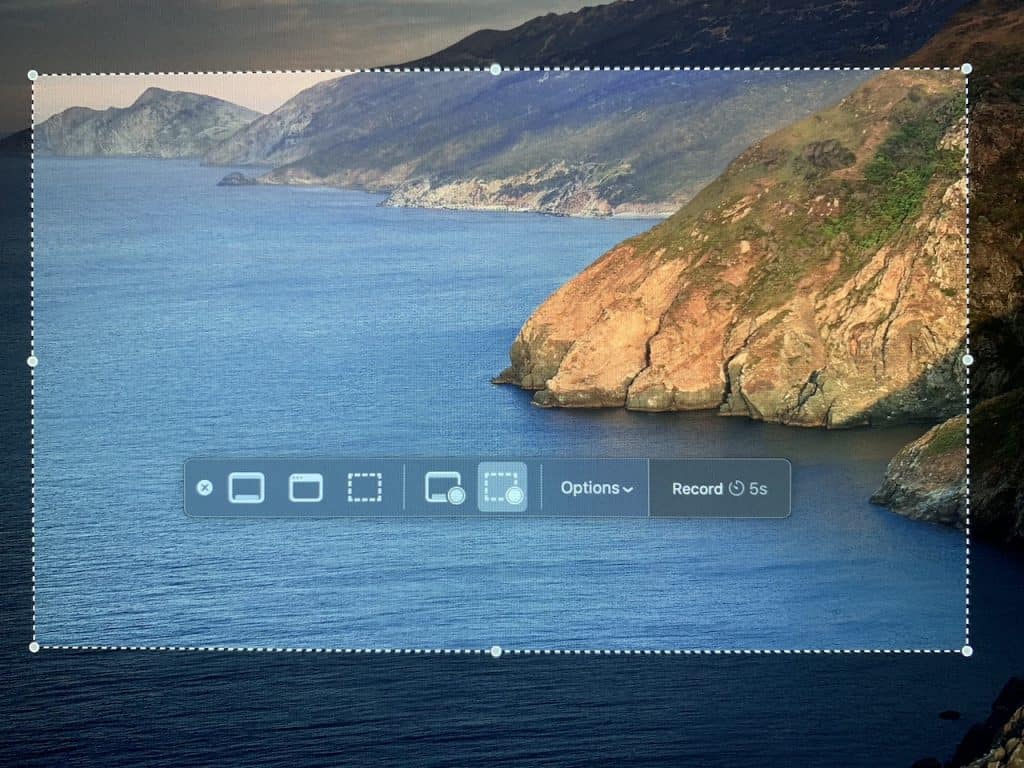
This is how the Quicktime Player record controls look on latest version of Mac OS Catalina. The process is the same as the video above – just slightly different controls. Scroll through two images.
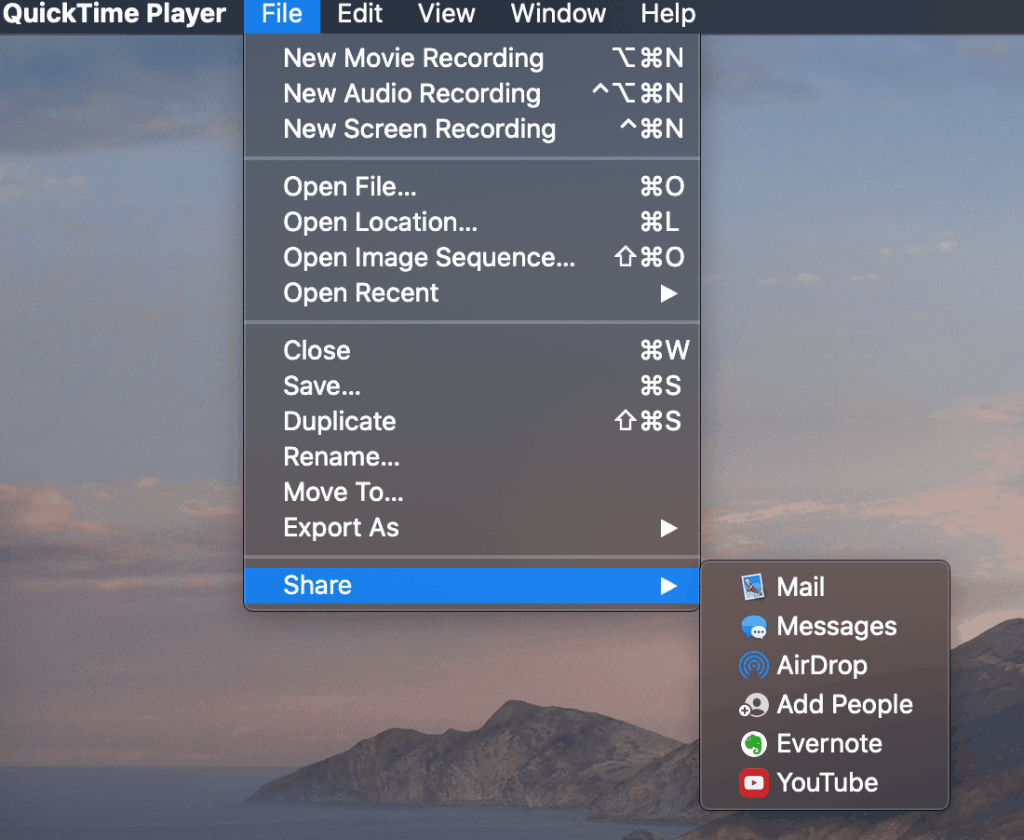
Once you have finished your screen recording. You can upload to YouTube directly from QuickTime using “Share”
Once your video is on YouTube get your YouTube video’s URL and paste it into YouTube Block in WordPress
Here’s two QuickTime Screencasts from last spring’s class
Shoot a video using your smartphone. You can use little slips of paper or you could draw. If you’re not an artist, you could also shoot a video of you reading a picture book. Here’s a collection of picture book read alouds to inspire you. Note: You’ll need an extra pair of hands or tripod rig to hold the phone.
Here’s TWo Sketch lessons from last spring’s class
Students will design and record a lesson. They will embed the video into a blog post and briefly describe lesson context, audience and purpose: For example, is this to help parents with homework?Or to provide students background for a new unit
If you use Quicktime Player, they should plan to load it up to your YouTube account and embed using the YouTube block built into WordPress.
If you shoot a sketch video on your phone, you can transfer it to a computer and then upload to YouTube from there. Embed using the YouTube block built into WordPress.
To open class we will take a look at FlipGrid – a free video chat tool. It may come in handy if UP classes are suspended.
We’ll look at three free video-creation apps – Toontastic, Clips and Adobe Express Video. All are easy-to-use for video storytelling and are popular with teachers and folks who want to produce fun video content for their social networks.
Students will be organized into teams and assigned one of three apps. Teams will “figure out” their assigned app and prepare a sample video and brief instructional review to share back with the full class.
There will not be any instruction on how to use the apps – we want students to be able to experience the learning curve for a new user. Plus we will be relying on students using their own iOS and Android smartphones – also known as BYOD (Bring your own device).
Meet the apps and see a sample from spring ’19 class
Toontastic – a Google project for creating animated stories. Choose from cast of character and backgrounds. Narrate and create a story. It runs on iOS and Android phones and tablets. Also select Chromebooks. No social network sharing features.
Made with Toontastic
Clips – an Apple project that makes cool videos designed for sharing on social media. Think Instagram on steroids. Shoot you own images or videos or use animated versions of yourself. Auto transcribe your words into titles. Add filters, stickers or shoot green screen. It is iOS only and runs on iPhone, iPad, and iPod Touch. Built in social network sharing.
Made with Clips
Adobe Express – Part of the Adobe suite. Built in storyboards allow you to integrate images, video, sound. Choose public domain images and soundtrack. Runs on iPhone, iPad. But also can be used with desktop browser. Built in social network sharing.
Student will pick one of the apps and use it to tell a story. Here’s some ideas for writing prompts
A myth, fairytale or folktale
A quick synopsis of a book or movie
Something instructional
Another great idea you have for a story to tell
OUTPUTTING THE VIDEOS – THERE ARE MULTIPLE WAYS TO DO THIS. HERE’S A FEW:
Toontastic videos can be moved to your iPhone photo gallery. If you then move them to a Mac desktop, you can upload to YouTube using QuickTime Player. Then embed YouTube video. We’ll figure out the Android method.
Clip videos can be uploaded to YouTube directly from the Clips App. Then embed YouTube video.
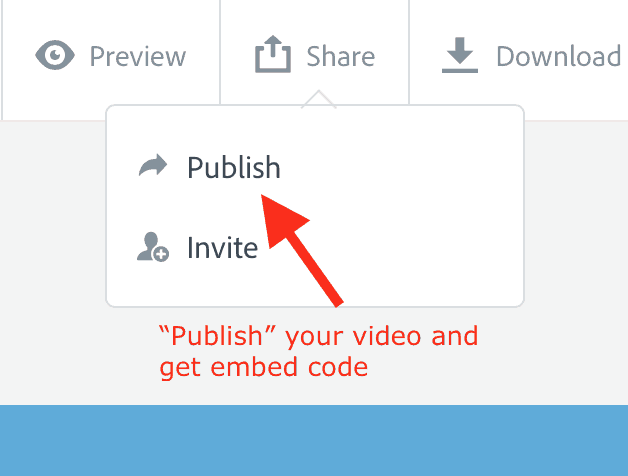
If you use the desktop version of Adobe Spark Video, you can get an embed code for your video. (Or download and then upload to YouTube via Quicktime Player
Toontastic and Clips video can uploaded first to YouTube
Your post should include an embedded examples of a video made using the app. If you upload the video to YouTube, you can use the YouTube block on WordPress with the URL of video.
Adobe Express Video provides embed code you can use HTML Snippets
Publish your Adobe Express Video and follow prompts to embed code.
We will open class with a review of our sites and we’ll tale look at two Google applications: 1. Google Forms integration into MyMaps: “My Dream Vacation” Link 2. Google Drawings Shapegrams
Where I’m From I am from clothespins, from Clorox and carbon-tetrachloride. I am from the dirt under the back porch. (Black, glistening, it tasted like beets.) I am from the forsythia bush the Dutch elm whose long-gone limbs I remember as if they were my own.
I’m from fudge and eyeglasses, from Imogene and Alafair. I’m from the know-it-alls and the pass-it-ons, from Perk up! and Pipe down! I’m from He restoreth my soul with a cottonball lamb and ten verses I can say myself.
I’m from Artemus and Billie’s Branch, fried corn and strong coffee. From the finger my grandfather lost to the auger, the eye my father shut to keep his sight.
Under my bed was a dress box spilling old pictures, a sift of lost faces to drift beneath my dreams. I am from those moments– snapped before I budded — leaf-fall from the family tree.
Use the poem as inspiration for your digital story of “Where I’m From” using Adobe Spark Page. Use Adobe embed code with HTML Snippets to add to your post. (how to below).
First “write” your story, then use Adobe Spark Page to illustrate it. (It does not have to be as long or artistic as the one above – but have fun with it and make it personal.) It should have a title that starts “I’m from (something artsy).” Be sure to put your name in the subtitle.
Your WordPress post should include:
Featured image (could be image used your story)
A post title that is the same as your digital story
The “text-only” version of your story
Your embedded digital story
Your thoughts on telling stories with Adobe Spark Page
Resources
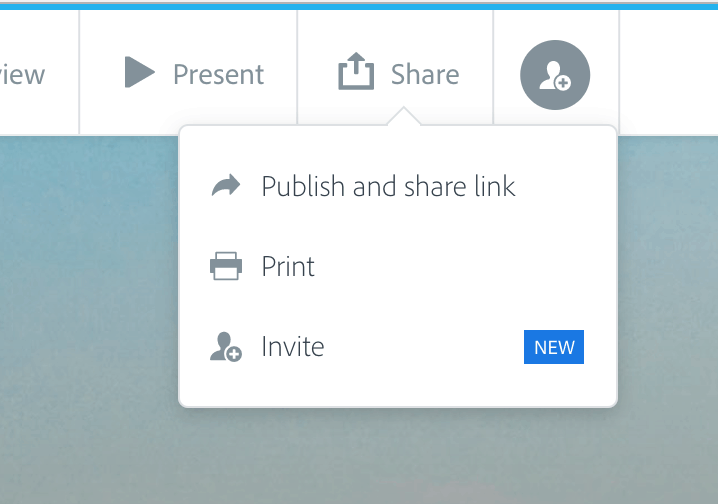
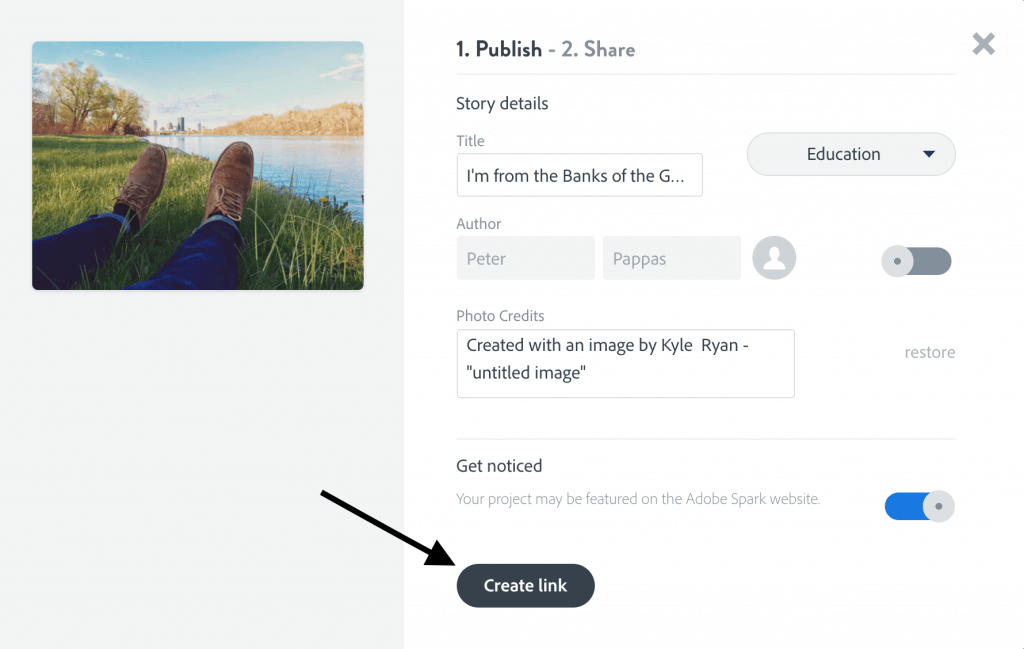
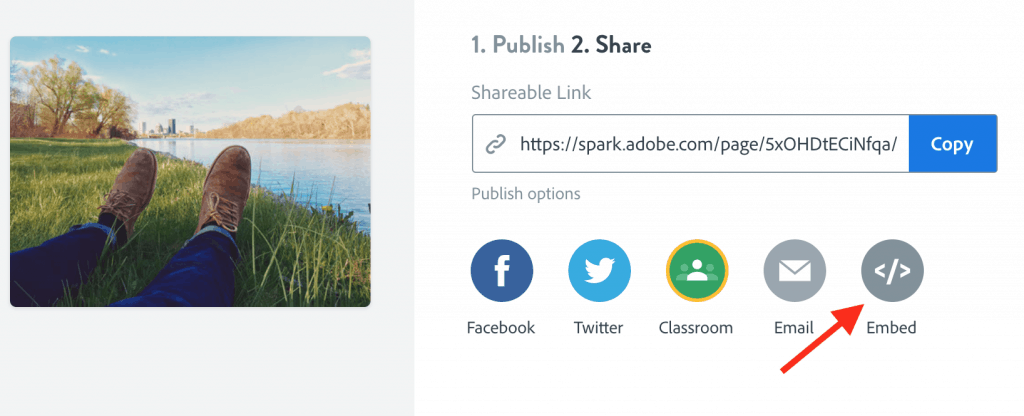
How to get Adobe Spark Page embed code to use with HTML snippets
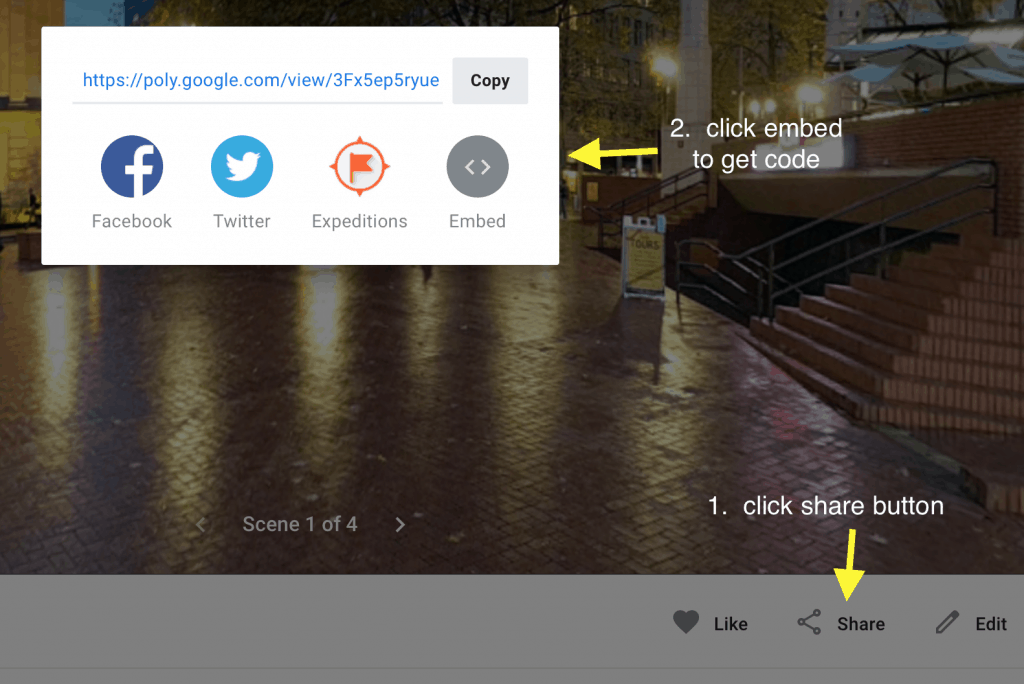
1. Click Share
2. Create Link
3. Get embed code
How to make a webpage with Adobe Spark Page
Sample Stories with Adobe Spark Page (WE had a different prompt last year)
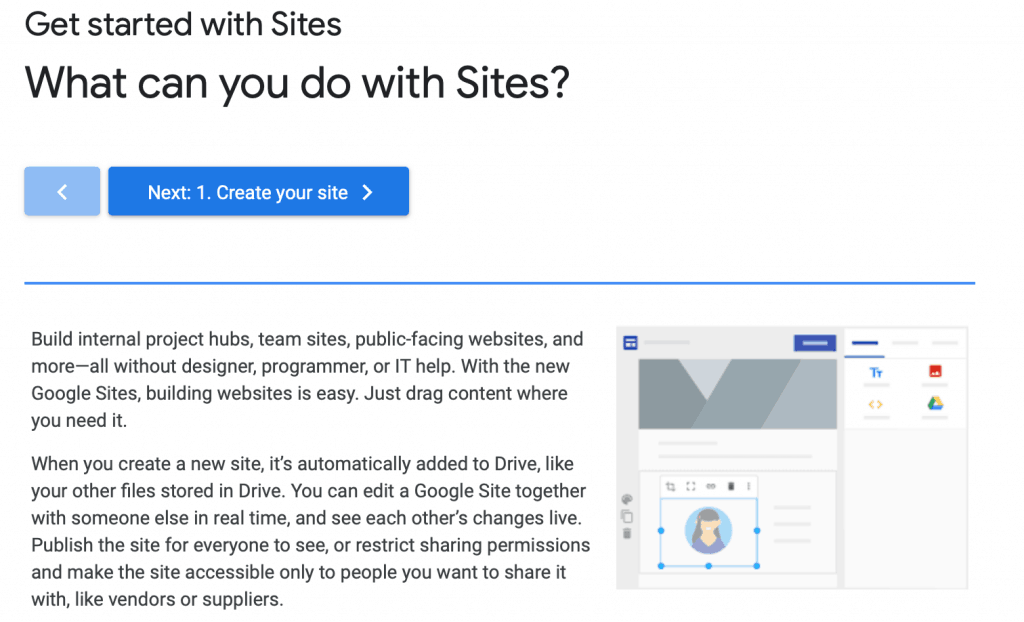
In today’s class we’ll learn how to create a website using Google sites. Sites are free and become part of your content stored in Google Drive. Sites can easily showcase content you have created using Google docs, slides, forms, MyMaps, Tour Creator or YouTube videos. Note: be sure to use the new (not classic) google sites.
We will begin by exploring some Hyperdoc lesson ideas (learning activities designed using the Google Suite.) Then we will have some basic instruction on creating a Google site and importing content from a variety of sources.
“Places are locations having distinctive features that give them meaning and character that differs from other locations. Therefore, places are human creations, and people’s lives are grounded in particular places. We come from a place, we live in a place, and we preserve and exhibit fierce pride over places.”
National Geography Standard 4: Place
In today’s class we will explore interactive images with Google Tour Creator and Google MyMaps. All apps provide tools for teachers and students to create and share interactive images that can contain additional multi-media content.
Google Tour Creator (a Google project) uses Google’s vast StreetView library as well as additional surround images to to build immersive, 360° tours right from your computer. It can be easily embedded in WordPress or shared via email and social media. See sample tours here.
Google MyMaps is a great tool for visualizing place with a variety of content and locational tools. It can be easily embedded in WordPress or shared via email. When you open a MyMap on your smartphone you can used it as a navigational tool. MyMaps gets saved in your Google Drive account for easy cataloging.
Peter will offer a brief intro into each app and students will take an initial look at how to use each app. We will then generate some ideas for how each app could be used in the classroom.
Students will one of the apps to design a sample interactive learning activity. Design a map representation of a place that can support a learning activity. Be sure to have multiple locations and some text or visual content at each location. Try these prompts:
A community tour around school.
A real or fictional journey.
Explore the setting of a story.
Create a “timeline” using map layers.
Plot locations of habitats / geographic features.
Share an interactive map of a field trip with parents.
Make a map of authors you’ve read
When your map is complete, embed it in a blog post that details what you hoped to convey in your map, and/or what you learned from the experience. Video on how to use HTML snippets.