Class 8: Tell Stories with Video

Tell stories with video

To open class we will take a look at FlipGrid – a free video chat tool. It may come in handy if UP classes are suspended.

We’ll look at three free video-creation apps – Toontastic, Clips and Adobe Express Video. All are easy-to-use for video storytelling and are popular with teachers and folks who want to produce fun video content for their social networks.  

Students will be organized into teams and assigned one of three apps. Teams will “figure out” their assigned app and prepare a sample video and brief instructional review to share back with the full class. 

There will not be any instruction on how to use the apps – we want students to be able to experience the learning curve for a new user. Plus we will be relying on students using their own iOS and Android smartphones – also known as BYOD (Bring your own device).

Meet the apps and see a sample from spring ’19 class

Toontastic  – a Google project for creating animated stories. Choose from cast of character and backgrounds. Narrate and create a story. It runs on iOS and Android phones and tablets. Also select Chromebooks. No social network sharing features. 

Made with Toontastic

Clips – an Apple project that makes cool videos designed for sharing on social media. Think Instagram on steroids. Shoot you own images or videos or use animated versions of yourself. Auto transcribe your words into titles. Add filters, stickers or shoot green screen. It is iOS only and runs on iPhone, iPad, and iPod Touch. Built in social network sharing. 

Made with Clips

Adobe Express – Part of the Adobe suite. Built in storyboards allow you to integrate images, video, sound. Choose public domain images and soundtrack. Runs on iPhone, iPad. But also can be used with desktop browser. Built in social network sharing. 

Made with Adobe Spark Video

ASSIGNMENT | Videos 20-A8

Student will pick one of the apps and use it to tell a story. Here’s some ideas for writing prompts

  • A myth, fairytale or folktale
  • A quick synopsis of a book or movie
  • Something instructional
  • Another great idea you have for a story to tell
OUTPUTTING THE VIDEOS – THERE ARE MULTIPLE WAYS TO DO THIS.
HERE’S A FEW:
  • Toontastic videos can be moved to your iPhone photo gallery. If you then move them to a Mac desktop, you can upload to YouTube using QuickTime Player. Then embed YouTube video. We’ll figure out the Android method.
  • Clip videos can be uploaded to YouTube directly from the Clips App. Then embed YouTube video.
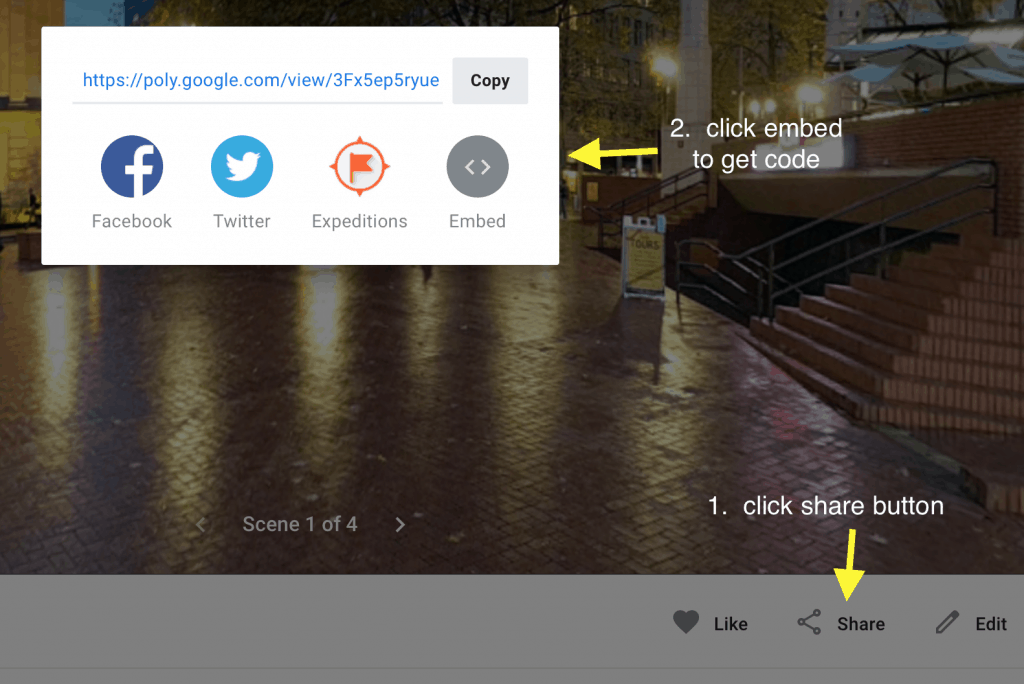
  • If you use the desktop version of Adobe Spark Video, you can get an embed code for your video. (Or download and then upload to YouTube via Quicktime Player
Toontastic and Clips video can uploaded first to YouTube

Your post should include an embedded examples of a video made using the app. If you upload the video to YouTube, you can use the YouTube block on WordPress with the URL of video. 

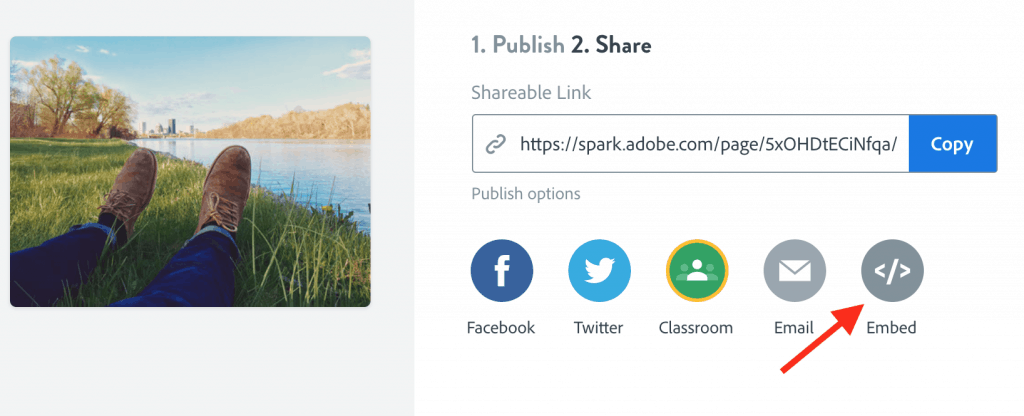
Adobe Express Video provides embed code you can use HTML Snippets

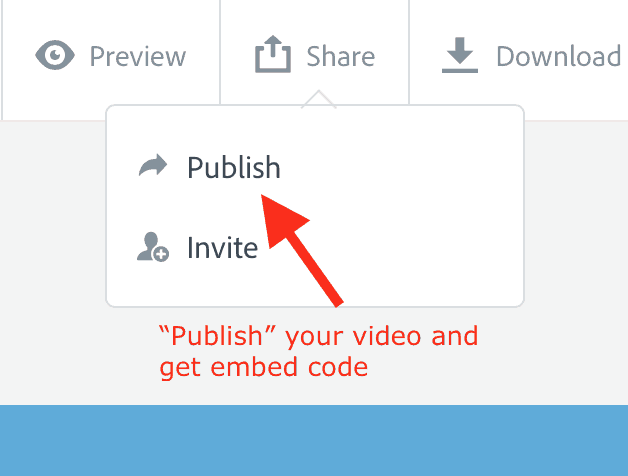
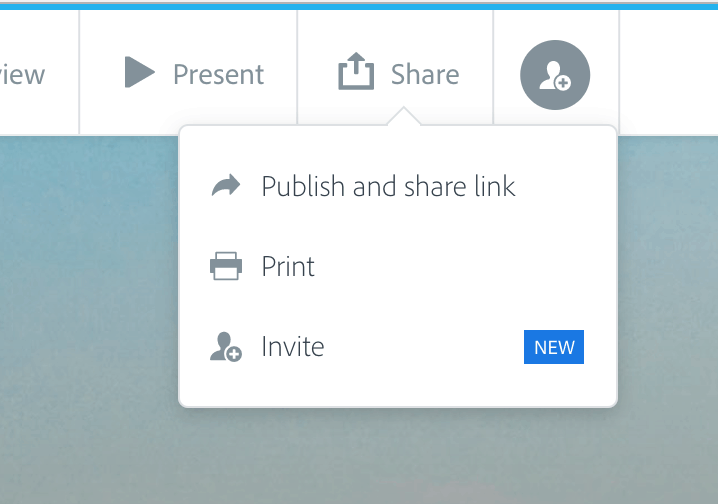
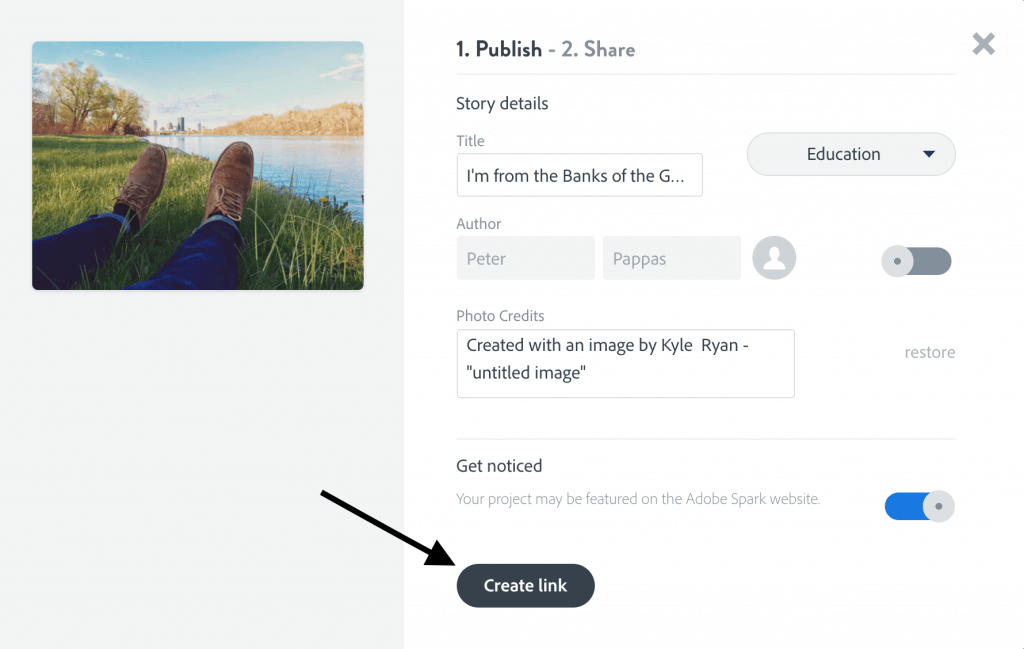
Publish your Adobe Express Video and follow prompts to embed code.

Class 7: Where I’m From: Telling Digital Stories

Where I'm From

We will open class with a review of our sites and we’ll tale look at two Google applications:
1. Google Forms integration into MyMaps: “My Dream Vacation” Link
2. Google Drawings Shapegrams


In the poem, “WHERE I’M FROM,”  George Ella Lyon tells the story of her youth in Kentucky

Where I’m From
I am from clothespins,
from Clorox and carbon-tetrachloride.
I am from the dirt under the back porch.
(Black, glistening,
it tasted like beets.)
I am from the forsythia bush
the Dutch elm
whose long-gone limbs I remember
as if they were my own.

I’m from fudge and eyeglasses,
from Imogene and Alafair.
I’m from the know-it-alls
and the pass-it-ons,
from Perk up! and Pipe down!
I’m from He restoreth my soul
with a cottonball lamb
and ten verses I can say myself.

I’m from Artemus and Billie’s Branch,
fried corn and strong coffee.
From the finger my grandfather lost
to the auger,
the eye my father shut to keep his sight.

Under my bed was a dress box
spilling old pictures,
a sift of lost faces
to drift beneath my dreams.
I am from those moments–
snapped before I budded —
leaf-fall from the family tree.

~ George Ella Lyon
ASSIGNMENT 7: WHERE I’M FROM | Stories 20-A7

Use the poem as inspiration for your digital story of “Where I’m From” using Adobe Spark Page. Use Adobe embed code with HTML Snippets to add to your post. (how to below).

First “write” your story, then use Adobe Spark Page to illustrate it. (It does not have to be as long or artistic as the one above – but have fun with it and make it personal.)
It should have a title that starts “I’m from (something artsy).” Be sure to put your name in the subtitle.

Your WordPress post should include:

  • Featured image (could be image used your story)
  • A post title that is the same as your digital story
  • The “text-only” version of your story
  • Your embedded digital story
  • Your thoughts on telling stories with Adobe Spark Page
Resources

How to get Adobe Spark Page embed code to use with HTML snippets

How to make a webpage with Adobe Spark Page

Sample Stories with Adobe Spark Page
(WE had a different prompt last year)
where i've been Things I love and don't love Where to?

Class 6: Design Learning with Google Sites

Design Learning with Google sites

In today’s class we’ll learn how to create a website using Google sites. Sites are free and become part of your content stored in Google Drive. Sites can easily showcase content you have created using Google docs, slides, forms, MyMaps, Tour Creator or YouTube videos. Note: be sure to use the new (not classic) google sites.

We will begin by exploring some Hyperdoc lesson ideas (learning activities designed using the Google Suite.) Then we will have some basic instruction on creating a Google site and importing content from a variety of sources.

Assignment 5: Design a Google site | Sites 20-A6

Working solo or with a partner, design a learning activity that is supported by Google site. The Google site and WordPress elements

1. Google site – Start Page (Home Page)
Be sure to include:

  • Unique header image
  • Title of the lesson
  • Author (s) of the lesson
  • Target student group. Grade, course
  • Lesson context? – for example – introduction, pre-assessment, part of bigger unit, etc
  • The intent of the lesson –  for example – what would students know or be able to do? Or what feedback would teacher gain?

2. Google siteAt least 5 additional pages that provide resources and activities for the students
Be sure to include:

  • Unique header image for each of the pages
  • A pre or post assessment using a Google form
  • At least 4 content elements from the following Google suite: Slides, Forms, Docs, My Maps, Tour Creator, YouTube Videos (made by someone else)

3. A WordPress post that showcases the site.
Be sure to include:

  • Fun title and featured image
  • An image of the site that serves as hyperlink (see how to video below)
  • A brief write up about the site that includes – material from your start page list above

Resources

How to create an image link to your Google site and put it into WordPress

Get started with Google Sites


G Sites Learning Center


Class 5: Create Interactive Lessons with Google Docs and Forms

Create Interactive Lessons with Google Docs and Forms

Today’s class will explore how to use Google Docs and Forms to create interactive student lessons, Class will begin by reviewing some sample lessons:

We will discuss how they can be used in the classroom in a variety of ways. Then we will review how to create both Docs and Forms.


Assignment 5: Design a Lesson Using a G Doc or Form | Google form Lessons 20-A5

Students will design a lesson and embed it in a blog post. The post should include the following:

Note: this lesson could be designed for a real or hypothetical class

  1. Featured image and fun title
  2. Target student group. Grade, course
  3. Lesson context? – for example – introduction, pre-assessment, part of bigger unit, etc
  4. What tech set up would students use? – for example – 1:1? Learning stations, etc
  5. The intent of the lesson – for example – what would students know or be able to do? Or what feedback would teacher gain?
  6. How G Doc or G Form will be used to help achieve lesson intent.
  7. Embedded G Doc or G Form

Resources – How to GEt Embed codes (Then use with HTML SNippets)

How to get an embed code for a Google Form – Follow steps to get embed code to use with HTML Snippets to embed in WordPress

How to get an embed code for a Google Doc

To embed a Doc into your blog, open the document. Select the Publish to the Web under the File menu.

Click the Publish button.

Then copy the embed code and use with HTML Snippets to embed in WordPress

Class 4: Explore Place with Digital Maps

Explore Place with Digital Maps

“Places are locations having distinctive features that give them meaning and character that differs from other locations. Therefore, places are human creations, and people’s lives are grounded in particular places. We come from a place, we live in a place, and we preserve and exhibit fierce pride over places.” 

National Geography Standard 4: Place

In today’s class we will explore interactive images with Google Tour Creator and Google MyMaps. All apps provide tools for teachers and students to create and share interactive images that can contain additional multi-media content. 

Google Tour Creator (a Google project) uses Google’s vast StreetView library as well as additional surround images to to build immersive, 360° tours right from your computer. It can be easily embedded in WordPress or shared via email and social media. See sample tours here.

Google MyMaps is a great tool for visualizing place with a variety of content and locational tools. It can be easily embedded in WordPress or shared via email. When you open a MyMap on your smartphone you can used it as a navigational tool. MyMaps gets saved in your Google Drive account for easy cataloging.


Peter will offer a brief intro into each app and students will take an initial look at how to use each app. We will then generate some ideas for how each app could be used in the classroom.

ASSIGNMENT 4 | Google Map Lessons 20-A4

Students will one of the apps to design a sample interactive learning activity. Design a map representation of a place that can support a learning activity. Be sure to have multiple locations and some text or visual content at each location. Try these prompts:

  • A community tour around school.
  • A real or fictional journey.
  • Explore the setting of a story.
  • Create a “timeline” using map layers.
  • Plot locations of habitats / geographic features.
  • Share an interactive map of a field trip with parents.
  • Make a map of authors you’ve read

When your map is complete, embed it in a blog post that details what you hoped to convey in your map, and/or what you learned from the experience.  Video on how to use HTML snippets.

Ideas for using Tour Creator and a “how to” below
How to get Tour Creator embed code – Once you have published your tour. Click on “View Tour” then follow two steps below to get embed code
Once you have published your tour. Click on “View Tour” then follow two steps above to get embed code
MyMap “how to’s” below

Class 3: Create Interactive Lessons with Google Slides

Lesson 2: Interactive Lessons with Google slides

We will begin our look at Google tools with Google Slides. Students will work in teams to explore some sample Google slide activities here. 

They will select one of the activities and prepare a short presentation to class on: 

  • How is it designed – features, interactions, navigation, external assets.
  • It’s instructional goals
  • What they liked / disliked about it. For example, ease of use?
  • How it could be modified and used in other learning activities.
ASSIGNMENT 3: DESIGN A LEARNING ACTIVITY WITH GOOGLE SLIDES | Slides 20-A3

Working alone, or in a team of two, students will design a learning activity using Google slides. They will embed the slide activity in a blog post that describes

  • Target student audience
  • Lesson goals
  • How you would use it with students
RESOURCES for adding your Google slide show to WordPRess post
Step 1: Set up sharing and get an embed code to use on WordPress.
Step 2: Use HTML Snippets on WordPress with an embed Code

Video guides working with Google Slides
Working with Google Slides

Class 2: Teaching in the Digital Era

Teaching in the digital era

This class will lead off with a  discussion of our first class and assignment. Next, Peter will do a short presentation: “Teaching in the Digital Era” It explores the skills we need to be “digitally literate in the modern world.”

  • Find, decode and critically evaluate information
  • Curate, store and responsibly share information

Teaching in the Digital Era Handout / 5mb PDFDownload

To hone our digital literacy skills, we will explore search techniques with a focus on finding public domain or Creative Commons licensed content. For more information on public domain searches visit our Copyright Free Content page.

ASSIGNMENT 2 | Posts 20-A2

We will use this assignment as a chance to practice our public domain search skills. It will also involve a bit of curation to decide which images to use. More on curation skills.

Students should think of a brief learning activity that involves using at least three images. For example:  vocabulary, pre-reading activity, activate prior knowledge etc. (Don’t worry too much about activity – we’re mastering some WordPress skills) See sample post here.

Use the images in a blog post that serves as a quick guide to how you might use these images in the activity. Be sure to include the images with citations and also have at least one featured image. (Could be one of the images or something different you made with Adobe Spark).

Students should be sure to check that the images used are public domain or creative commons licensed. Include a hyperlink back to creator / source. 

~ good digital hygiene

Insert a hyperlink into a WordPress post


How to add an image or gallery to a WordPress post

Class 1: Tech-Savvy Teacher’s Meme

Here’s the flow of our first class  – a chance to get to know more about the course and try our hand at our first two tech tools.

  1. This our first class  … so … some intro activities.
  2. Peter will offer a  quick demo of AdobeSpark Post –  a great tool for creating striking title slides with public domain content.  See video below for more.
  3. Students will get a quick overview of WordPress and be pointed to our WordPress 5.0 Playlist. Next, students will work in small groups discussing their vision of the tech-savvy teacher. They will be invited to turn those ideas into memes using AdobeSpark Post
  4. While students are working, Peter will get each student logged into our WordPress account.
  5. We’ll have a meme smackdown and reflect on the activity and how the classroom workflow was designed and managed.

ASSIGNMENT 1 / MEMES 20-A1

Task 1: For your first blog post write an elaboration / explanation of your meme. The post is due by midnight Sunday Jan 19th.

Students should be sure their post includes a featured image (meme) made using  AdobeSpark. Use your meme from class or make a new one.

Here’s some post prompts – feel free to use one or more for inspiration.

How the meme reflects …

  • What you’ve learned about edtech in the classroom.
  • The challenges or opportunities of edtech.
  • Where do I want to be in my use of edtech tools in 3 years.

Task 2: Before our Jan 22nd class, comment on at least 2 student posts. It’s a conversation, not simply a … “nice job.”

HOW TO USE ADOBE SPARK POST
HOW TO LOG INTO WORDPRESS
HOW TO WRITE YOUR FIRST WORDPRESS BLOG POST

Final Reflection

Students final post will be a reflection on both ed tech and our project-based approach to learning. Due May 1st.

Completed reflections 19a-14

Here are two questions for you to answer:

  1. What did you learn about the intersection of technology and instruction? What was your progress on becoming a “tech-savvy” teacher?
  2. This class was driven by mini-projects instead of test and papers. How did you respond? What does that tell you about student motivation?

End of course checklist

  1. Final project posted
  2. Final project blog post exported as pdf and uploaded to TaskStream
  3. Final Reflection posted by May 1st
  4. Double check you have posted all 14 assignment to blog.
  5. SmartEval completed (Accessible April 21-28)

Final Project

the final project

Working as individuals or with one partner, students will design and deliver a 20-25 min learning experience to the class. View finished projects here.

April 17th Presentations
Lauren Alvarez and Audrey Muller
Emily Bechen
Samantha Laughlin and Sabrina Pangelinan
Rylee Seekins, Ysabelle Saguin and Caroline Halvorson

April 24th Presentations
Heidi Parrett and Hannah Patrick
Amy Huang and Megan Bromley
Sherry Steppel and Makamae Nottage
Madi Ohashi and Lauren Nakashima

May 1st Presentations
Katie Adams and Sydney Fritz
Austin Gray

Students should incorporate one or more digital tools that demonstrate how to effectively integrate technology into a learning experience. Your goal is good alignment between the technology and the learning experience

Lessons can be “taught” as if being delivered to school age students or as “adult PD” as if delivered to peers.

Students should prepare a blog post (due when they are presenting) that explains your instructional goals and how they are supported / enhanced by the technology.

Be sure your post includes:

  1. target audience
  2. subject of lesson – embed or link to teaching content.
  3. instructional goal (what do you want students to know or be able to do)
  4. technology being used
  5. how technology supports instuctional goal

Class 12: Promote Active Viewing

Promote Active Viewing

This week our focus will be designing lessons around existing video content. There’s so much video content out there – here’s four tools you can use to associate questions, comments, quizzes and notes with specific passages in a video. You can help students truly interact with the video content, rather than passively consuming it.

Students will work in teams to evaluate five apps that all assist teachers in turning videos into lessons. Each video lesson builder has different features that allow teachers to annotate and add instruction content to existing video. They also have different assets and liabilities. Students will have a chance to explore the five apps in small groups. Groups will then briefly share their appraisal. Students will then select an app to use for this week’s assignment.

First off – a quick nod to ViewPure – an easy way to share video content with students without “risking” related sidebar content. Click here to “purify” a video.

Then here’s our four video lesson builders.

  1. TEDed – build a lesson around any TEDed original, TED talk or YouTube video
  2. EdPuzzle – Pick a video, add your magical touch and track your students’ understanding
  3. VideoAnt – Use VideoAnt to add annotations, or comments, to web-hosted videos.
  4. Vialogues – A free service that allows you to build online discussions around videos hosted online

More resources:

Assignment | Post 19-A12

Use one of the five video lesson apps to turn a video into a lesson. You can use a video you create or a video you find on the internet.  In the post include a written description of the audience and purpose of your lesson.

Here’s how to get your finished annotated video into your WordPress post.

  1. TEDed – TEDed does not provide an embed feature. So you can take a screenshot of your TEDed lesson and use it in you post with a hyperlink to the full lesson.
  2. EdPuzzle – Get an embed code and use with HTML snippets
  3. VideoAnt – Get an embed code and use with HTML snippets
  4. Vialogues – Get an embed code and use with HTML snippets

Class 11: Teaching with Screencasts

Class will open with brief updates on final projects.


Edtech guru, Kathy Schrock defines screencasting as “the capture of the action on a computer screen while you are narrating. Screencasts can be made with many tools and are often used to create a tutorial or showcase student content mastery.” A related practice is slidecasting (creating a PowerPoint or Apple Keynote slideshow and then screencasting your narration of it as it plays on the screen). Here’s my Keynote turned video.

There are many other variations – Paperslide Videos, anyone?

Here’s a few tips for video creation:
  • Keep it simple. Think of audience and purpose. See One Take Video
  • I favor taking complex instructions and turning them into multiple shorter videos covering specific aspects of the task. Some students know one thing and not another. Why make them sit through a long how-to.
  • I use a plug in mic (just a standard iPhone earbud mic works well) rather than the microphone built into my Mac. I do a quick test screencast to check the volume level and mic position first to get sound level right.
  • I first practice the skill a few times to find efficient ways to demonstrate and describe what I am doing.
  • If I will be entering much text as part of the task, I create a text document first so I can copy/paste text into the app I’m demonstrating ( I hate watching videos of people typing.)
  • I make sure any images, websites or other content I will use in the video are readily available.
  • I try and do the screencasts in one take. I don’t worry too much about flubbing words – hey, it’s only a screencast.
Three options for creating videos – there are many more

Option 1: Screencast with “Loom.” An easy to use Chrome browser plug in – works on any computer or Chromebook. Your video is hosted at Loom.

Loom is a free Chrome browser plug in. To get Loom open your Chrome browser and get the Loom extension here.  It makes it super easy to record using your webcam, screen or both. The resulting video can be embedded into a blog or shared via email or social media. A great way to explain something in a visual way.

Note: Since making this video the embed code is now found by clicking the curved Share Arrow at lower right of video. Then pick </> Embed 

Where to get Loom embed code.

Option 2: Screencast with Quicktime Player (easy and built into Macs). But if you want to post on blog, you need to “host” the video on YouTube.

I typically use Quicktime Player, which is built into the Mac OS. It’s easy to use and quickly uploads to my YouTube account.  

Then get your YouTube video’s URL and paste it into YouTube Block in WordPress

Here’s a screencast I made on how to use Quicktime Player to make a screencast. (very meta).

Option 3:  Screencasting with MediaSpace – part of UP tech suite / use with any computer. Has the most options for editing and more. Video hosted at MediaSpace

UP’s MediaSpace  is the most robust app of the three and it opens up a few more options for capture and editing that using Loom or Quicktime Player.  It also provides a place – MediaSpace – where student’s can upload the finished product.

Here’s a how to use Media Space video. Note: this video assumes you are using Moodle. We are not. So you can skip ahead to 1:35 min mark when Ben starts a new video. You might also want to check out video tutorials on Microphone Setup and how to Trim or Clip Your Media Space Video


Assignment: Create a screencast (or slidecast) | Posts 19-A11

Students will design and record a screencast (or slidecast) using one of the three screencasting tools. They will embed the video into a blog post and briefly describe:

  1. Audience and purpose: For example, is this to help parents with homework?
  2. How you would integrate it into your lesson: For example, the 1st day of class, I created time to meet individually by using screencast for Adobe Spark Post and WordPress instruction.

If you use Quicktime Player, they should plan to load it up to your YouTube account and embed using the YouTube block built into WordPress

If you use Loom or UP MediaSpace, the video hosting is taken care of. You will need to get embed code and use with WordPress’s HTML Snippets