Class 6: Screencasting Techniques

We will open our class with a student updates on their progress on our critical thinking design project and agree to some firm due dates. Then we will turn our attention to a new skill – screencasting.

Screencasting / Slidecasting

Edtech guru, Kathy Schrock defines screencasting as “the capture of the action on a computer screen while you are narrating. Screencasts can be made with many tools and are often used to create a tutorial or showcase student content mastery.” A related practice is slidecasting (creating a slideshow and then screencasting your narration of it as it plays on the screen). Kathy’s screencasting resources.

I make use of many edtech tools in my classes and workshops. Rather than teaching an edtech tool to everyone in a whole class setting, I think it is more efficient to make a short screencast and post it to my YouTube collection. That creates many flexible learning “tutorials” that I can use as part of flipped or blended lessons.

Here’s a few tips for screencasting:

  • I favor taking complex instructions and turning them into multiple shorter videos covering specific aspects of the task. Some students know one thing and not another. Why make them sit through a long how-to.
  • I use a plug in mic (just a standard iPhone earbud mic) rather than the microphone built into my Mac. (The built-in mic on my desktop sounds distant and echoes because of it’s placement in a corner of my office.) I check the volume level and mic position first to get sound level right and make sure I’m not “popping” when I say my “Ps.”
  • I first practice the skill a few times to find efficient ways to demonstrate and describe what I am doing.
  • If I will be entering much text as part of the task, I create a text document first so I can copy/paste text into the app I’m demonstrating ( I hate watching videos of people typing.)
  • I make sure any images, websites or other content I will use in the video are readily available.
  • I try and do the screencasts in one take. I don’t worry too much about flubbing words – hey, it’s only a screencast.

I typically use Quicktime Player, which is built into the Mac OS. It’s easy to use and quickly uploads to my YouTube account.  Here’s a screencast I made on how to use Quicktime Player to make a screencast. (very meta)


Screencasting with CaptureSpace

This week we’ll explore how to screencast / slidecast using the CaptureSpace tool that’s built into UP’s MediaSpace. It’s a robust app that opens up a few more options for capture and editing that using Quicktime Player.  It also provides a place – MediaSpace – where student’s can upload the finished product.

Note you might also want to check out video tutorials on Microphone setup and how to Edit Your Screencast Before Upload

Assignment

Student’s will use class time to design and record a screencast (or slidecast)  using CaptureSpace. If they use Quicktime Player, they should plan to load it up to there YouTube account. It could be related to our critical thinking design project, an upcoming lesson they hope to use in their placement, or just some content or skills they would like to describe.

After creating and uploading the video to UP MediaSpace, students should write and upload a blog post that describes what they hoped to accomplish with the video and what they see as the challenges and opportunities of screencasting / slidecasting. They should use the MediaShare “Share” function to create an embed code so they can include to their screencast in the blog post.

Here’s a how-to video explaining how to do that (made with QuickTime)

 Image credit: Adobe Spark public domain media

Class 5: VoiceThread and iMovie

This week students will report directly to the Digital Lab in Clark Library for training in using VoiceThread and iMovie.

They will learn to use VoiceThread commenting on our Critical Thinking Brainstorm presentation.

Our iMovie training will give students a chance to remix some classic WWII public domain propaganda films and cartoons. Such as Oscar nominated “Mr Blabbermouth” (1942):

Class 4: Elevator Pitch and Design

Today’s class will be our first brainstorm / design session building on Assignment 3: Brainstorming Critical Thinking Across the Curriculum

Class will open with each student giving a 5-minute “elevator pitch” followed by feedback from peers.

Next we will see if there are some common themes or approaches that tie all the individual ideas together.

Finally students will begin to capture some of their thinking on this shared Google Slide presentation.

Image credit: Flickr: Marco Wessel – Elevator Pitch for Katie

Assignment 3: Brainstorming Critical Thinking Across the Curriculum

During our discussion of Fake News, we realized that our students need more practice in the critical evaluation of information. We saw an opportunity to create a collection of lessons that teach critical thinking in various disciples such as math, science, history and English. Here’s a great example from math How to Lie, Cheat, Manipulate, and Mislead using Statistics and Graphic Displays. 3.9MB pdf

Assignment:

Come to class with ideas to share. You will have 5 mins each to give an “elevator pitch.”

So this coming week all students will brainstorm what content those lesson might cover, and how we might deliver the lessons. They might be standalone lessons or we might try to pick a common theme and approach it from different disciples. We’ll see.

This will likely be a multi-week project and a chance to use some new tech tools in a project-based approach. Plus when we are done, we’ll have a showcase product to share.

Here’s some content ideas we got started:

  1. Visual literacy – looking at images
  2. Map how to read news article
  3. Design and read infographic
  4. Lie with statistics
  5. Mr DNA guide (that guy from Jurassic Park)
  6. English – propaganda, world of text and author
  7. History – how narrative can be used to frame events from point of view. How do you look at evidence.
  8. Bad examples of critical thinking.

Delivery ideas:

  1. PDFs
  2. Blog posts
  3. Prezi, Powerpoint, Keynote
  4. Infographics
  5. Cartoon characters like Toontastic 3D
  6. Tests – Kahoot
  7. Memes
  8. Games
This project serves a number of purposes:
  • Work on our digital literacy skills
  • Focus first on good instructional design
  • Explore design and deliver of  PBL
  • Interdisciplinary approach allows all students to contribute from their perspective
  • Address an issue of critical importance
  • Provide a vehicle for utilizing a variety of tech tools
  • Provide an opportunity for assessing the efficacy of our methodology and tech tool selection

Image Credit: Flickr: Chris Potter 3D Bright Idea
ccPixs.com

Class 3: Fake News

“In search of answers, many of us ask our kids to “Google” something. These so-called digital natives, who’ve never known a world without screens, are the household’s resident fact-checkers. If anyone can find the truth, we assume, they can. Don’t be so sure.

True, many of our kids can flit between Facebook and Twitter while uploading a selfie to Instagram and texting a friend. But when it comes to using the Internet to get to the bottom of things, Junior’s no better than the rest of us. Often he’s worse.”

~ “Why Students Can’t Google Their Way to the Truth” Education Week  Reporting on 2016 research project with 7,804 students in middle school through college. Evaluating Information: The Cornerstone of Civic Online Reasoning link to 3.4 MB pdf

Today’s class will  explore the world of “fake news” with a focus on its implications for democracy in the digital age. This will serve as a kick off for our first extended lesson design project.

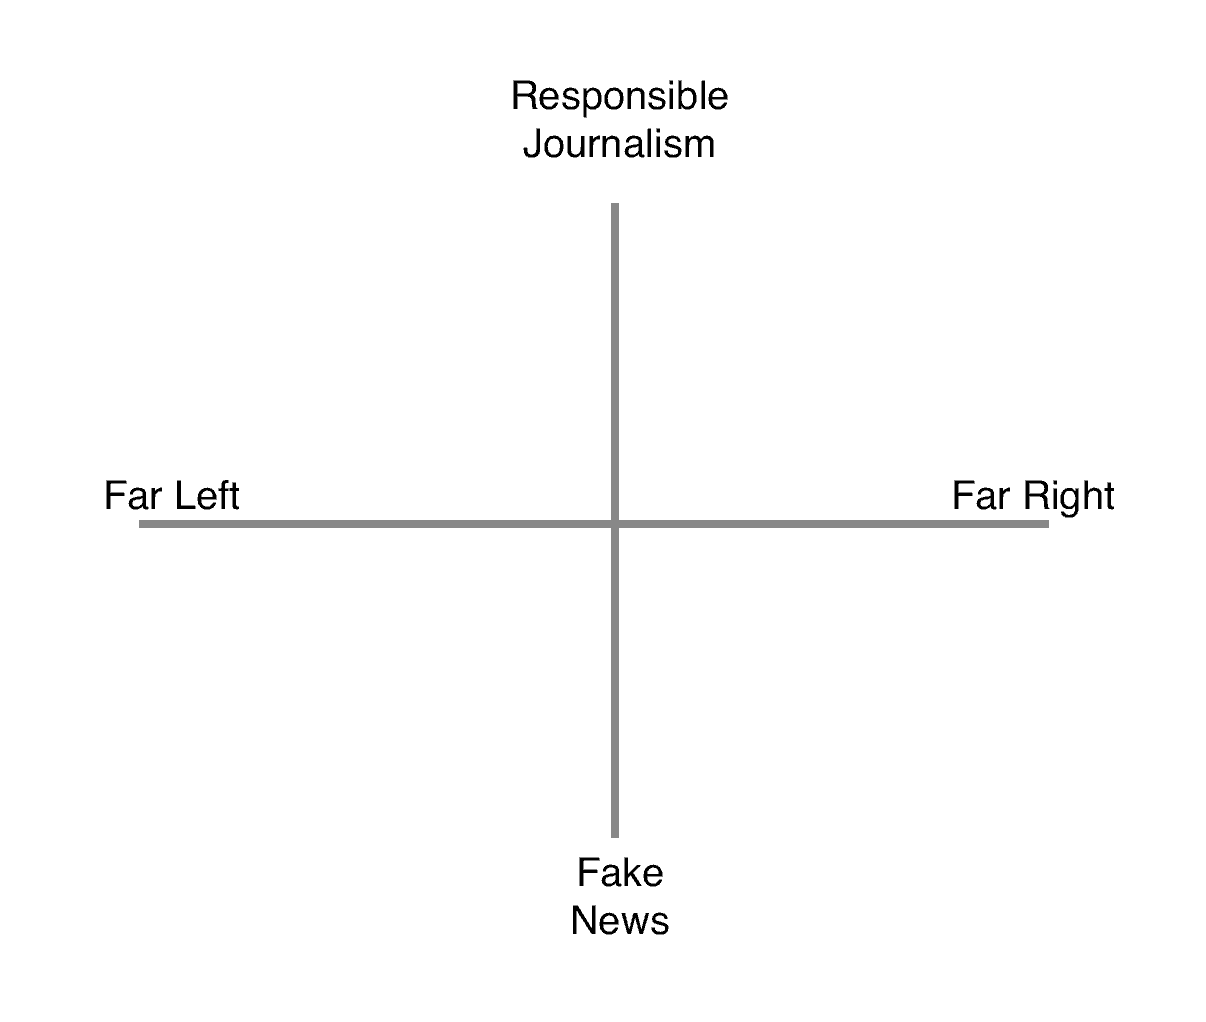
In class activities: we review social media feeds and used the graph below to classify some of the news stories.

Source for social media stories:

  • Our own social media feeds.
  • Searching Twitter (which shows content even w/o a Twitter account)
  • Blue Feed, Red Feed: See Liberal Facebook and Conservative Facebook, Side by Side ~  Wall Street Journal

Takeaways:

  • We are better at discerning right/ left continuum than responsible/fake news journalism continuum.
  • Fake news success at spreading information relies on an absence of critical thinking skills
Project: Media Literacy / Critical Thinking Design

We will begin a extended PBL focused on publishing a suite of lessons for teaching media literacy and critical thinking to intermediate – high school students. Flooded with information from the “post-truth world” of “alternative facts,” students will need to develop their own skills in recognizing “truthiness.”

This is a great vehicle for exploring critical thinking across the curriculum. Good critical thinking skills are the best defense against “fake news.” Here’s a model that might inspire us How to Lie, Cheat, Manipulate, and Mislead using Statistics and Graphical Displays 3.7MB pdf

Good starter article Evaluating Sources in a ‘Post-Truth’ World: Ideas for Teaching and Learning About Fake News

ASSIGNMENT:

Come to class with ideas to share. You will have 5 mins each to give an “elevator pitch.”

So this coming week all students will brainstorm what content those lesson might cover, and how we might deliver the lessons. They might be standalone lessons or we might try to pick a common theme and approach it from different disciples. We’ll see.

Image credit:  Graphic on Fake news website issue made by VOA News. Wikimedia Commons

Assignment: Find, Curate, Store

This assignment follows Class 2 – Jan 26: Digital literacy It will give us a chance to explore a few digital literacy skills – finding, curation,  storage and responsibly sharing non-copyright material.

To hone our digital literacy skills, we will explore effective search techniques with a focus on finding public domain or Creative Commons licensed content: including images, video, and audio. For more information on public domain searches visit our edtech methods toolkit / Digital Hygiene

We will incorporate some note taking tools to explore effective digital curation and storage.  I’ll suggest Microsoft OneNote, Evernote, or Google Keep. You may have another way to curate your collection.  This will allow us to also do a comparative analysis of these note taking tools.

Students should be sure to record the content (image, text, video) the URL, source institution or archive, and check to be sure it is public domain or creative commons licensed for use.

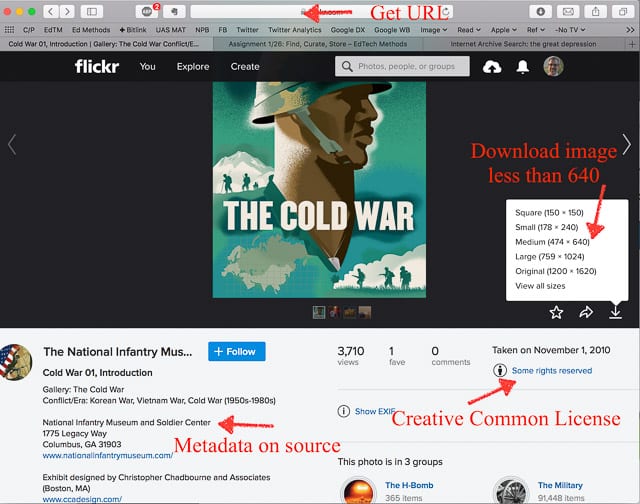
Here’s a sample image from Flickr showing where some of the information is located on a Flickr page.

HOMEWORK- Due Feb 2

Task 1: Now that you know how to find non- copyright images, students should find an image they like to illustrate their first post and update the post by adding a “Featured Image.” Here’s a video how to. 

Task 2: Many of the titles for the first post were rather “bland.” Consider updating title – It doesn’t need to be total clickbait – “I turned on the document camera and you won’t believe what happened next.” But perhaps a bit more descriptive?

Task 3: Working as individual (or in pairs) students should:

  1. Identify a topic to guide their source collection.
  2. Use a variety of search tools to locate at least ten public domain or Creative Commons sources related to that topic such as: text,  image, video or audio.
  3. Use one of the note taking tools (or other system) to collect the content – be sure to provide a hyperlink to the source institution or archive. The link should enable you to go back to the source material.

Task 4: Write a blog post that explores what you learned in this exercise. (Two person teams can cross post the same content.) You might consider reflecting on the task, search, note keep apps or the larger question of the need to teach digital literacy. If your selected note taking tool allows for public sharing, then include a link to your collection.

Featured image credit: 170/365: I can save myself… by Kit / Flickr

Assignment: First blog post

my first blog post
HOMEWORK for Jan 19

Task 1:  For your first blog post write a reflection on your use of edtech and where you hope to go with it. The post is due by midnight Sunday Jan 22. Read student responses here.

Students can access our YouTube Playlist for assistance with WordPress.

For specific prompts consider some of these (just some ideas starters, you don’t have to write about all of them):

  • What’s my current use of edtech tools in my placement?
  • How does the “tech landscape” of my current placement impact my use of edtech in the classroom?
  • How do the tech skills / demographics of my students impact my use of edtech in the classroom?
  • What are my personal uses of edtech tools to learn and network as an educator?
  • Where do I want to be in my use of edtech tools in 3 years?
  • What are you hoping for in this edtech pilot?

Task 2: Before our 1/26 class, comment on at least 3 student posts. It’s a conversation, not simply a “nice job.”

Class 2: Digital literacy

This class will lead off with a review of our thinking on this pilot course design. We will gather our ideas using this shared Google Doc.

Next, Peter will do a presentation “Teaching and Learning in a Digital World.” It explores the impact of new technologies and answers the question: Digital literacy handout 2.1 MB pdf

“So what happens in schools, now that life’s become an open book test?” 

We will explore the “new digital literacy:”

  • Find, decode and critically evaluate information
  • Curate, store and responsibly share information

To hone our digital literacy skills, we will explore search techniques with a focus on finding public domain or Creative Commons licensed content: including images, video, and audio. For more information on public domain searches visit our edtech methods toolkit / Digital Hygiene

We will incorporate some note taking tools to explore digital storage and curation – Microsoft OneNote, Evernote, Google Keep and Google Spaces. This will allow us to also do a comparative analysis of these note taking tools.

Homework

See assignment page – Find, Curate, Store

Classroom Tech: When Less is More

This was first posted Jan 21, 2015

I recently was a guest on the UP Tech Talk Podcast produced by University of Portland’s Academic Technology Services and hosted by Maria Erb (Instructional Designer) and Sam Williams (Dir of Academic Tech Services). Kudos for the great ATS podcast studio!

We had a lively 18 minute discussion about my UP social studies methods class and technology’s role in instructional design – it opened like this …

What’s the least amount of technology you could use to get the job done?

Maria: Peter, so glad to have you on the podcast. We just had a great conversation … you managed to rattle off probably half a dozen Web 2.0 tools that you’re using just like you were a fish swimming in water; it just seems so easy and natural for you. I’m just wondering, how do you go about choosing which tools you’re going to use for these great projects that you’re working on? What piques your interest?

Peter: I think it really begins with seeing yourself as a designer of a learning experience. You work with the tools you have and with the setting you have. You’ve got X number of students; you’re meeting once a week; you’ve got three hours with them. You think about the instructional goals that you want to achieve, and then from there, you say, okay, so what kind of tools are out there. For example, there was a situation where I wanted them to collaborate and design some lessons. I wanted them to be able to share their work with one another and be able to comment on it. I also think it’s important that there always be a public product, because I think we find our students producing content for their instructor as opposed to … which is kind of a ritualized thing as opposed to real-world content.

And ended with this exchange …

Sam: Are there any words of wisdom around it’s not about the technology that you could leave us at the end of this podcast?

Peter: I would say the big question is what’s the least amount of technology you could use to get the job done. Taking something and making it prettier by putting it on a white board when you could have written it up on the chalk board really doesn’t get you anywhere. I think that the transformative part of technology is getting it in the hands of the students so that they can research and create and produce in ways you couldn’t do without it. For me, those are the essential elements that I’m looking at, not simply just something that’s a bright shiny object.

Text transcript (word file) | Show notes and links | Podcast at iTunes: #12

The University of Portland uses the SmartEval system to gather student feedback on courses and faculty. Here’s a few comments from my UP students that are relevant to this podcast:

  • Peter challenged us to think and be designers of curriculum, instead of just lecturers. We learned how to get students working and thinking critically in the classroom.
  • I liked that the focus of the class was on making a product.
  • He also showed us how to move from the lecture mode to engaging students as architects in their own learning process.
  • Very well connected with other educators on Twitter. He has promoted every student in the class using his connections to help us build professional connections and build a professional online presence.

Class 1: What do you want to learn about edtech?

edtech - what do you want to learn?

Image credit: Jason Michael Mac Keyboard

First off we’ll explore our ED 424 goals and foundations.

For our intro we will explore the question “What do you want to learn about edtech?” We’ll split into four groups and each use a different means of collecting collaboration to gather input on the question – Coggle, Padlet, a shared Google doc, and an “old school” poster board. Later, each group will present their findings and we will discuss both responses and how the different tools helped or hindered our progress.

Next we will all get logged into our new WordPress account. Students will get a quick overview and be pointed to our YouTube playlist.

Homework

Task 1:  For your first blog post write a reflection on your use of edtech and where you hope to go with it. The post is due by midnight Sunday Jan 22. Read student responses here.

For specific prompts consider some of these (just some ideas starters, you don’t have to write about all of them):

  • What’s my current use of edtech tools in my placement?
  • How does the “tech landscape” of my current placement impact my use of edtech in the classroom?
  • How do the tech skills / demographics of my students impact my use of edtech in the classroom?
  • What are my personal uses of edtech tools to learn and network as an educator?
  • Where do I want to be in my use of edtech tools in 3 years?
  • What are you hoping for in this edtech pilot?

Task 2: Before our 1/26 class, comment on at least 3 student posts. It’s a conversation, not simply a “nice job.”

Student brainstorms completed in class – first 3 enlarge with click

Coggle Brainstorm 1

Coggle Brainstorm 2

Coggle Brainstorm 3

How to teach edtech to future teachers

I’ve been asked to pilot a new edtech class this spring for undergraduate ed majors in University of Portland’s School of Education. I’m still in the brainstorm phase and I thought I’d like to share some of my initial thinking.
First posted 10/19/16

First off  – a few things that I don’t want to do:

  • Oversell edtech. Too often educators try to force the latest edtech tool into the classroom because they think it’s cooler. Faster. Shinier.
  • Focus on teaching apps. Oh how I hated being forced to sit in a computer lab and suffer though PowerPoint professional development as a teacher. When I need students to use a specific app, I typically create a YouTube channel of short screencast how-tos. Or students can use the University’s Lynda account for more.
  • Take sides in the platform / device religious wars. These students will end up teaching in different settings, each with it’s own unique edtech landscape. They’ll need to be able to use what ever they find in their placements.

Instead I’d like to first “teach” adaptability – the mindset that’s helped me navigate the ever-changing edtech environment since I began my career in the early ’70s – an era of filmstrip projectors, 16mm movies and ditto machines. I’ve always thought first about my instructional goals, then tried to leverage whatever resources I could find to reach them. That calls for flexibility and a willingness to figure things out on your own. I couldn’t wait around for some school-sponsored PD.

A second, equally important goal would be to teach critical evaluation of the intersection of good instruction and technologies. A good teacher is skeptical, always re-assessing what’s working and what’s not. That’s especially important in the dynamic edtech world.

I envision a problem-based approach where I layout a series instructional challenges (opportunities?) and invite student teams to come back with a plan for achieving the goal using as much or as little technology as they saw fit. They would be expected to find a way to share their work in or out of class (why not flip that as well?) We would then go though a group evaluation, reflecting on what worked and what didn’t. Was the juice worth the squeeze? Move on to the next instuctional challenge. Reflect, rinse, repeat.

Here’s how I thought I might open my first class:  “Good instructional often begins with a pre-assessment. This is an edtech class, so as a starting point we need to get sense of where everyone resides on edtech landscape.”

  • What would be useful to know?
  • How should we gather that info?
  • How do we store and share (represent) what we find out?
  • Would any digital technologies be useful in this task? If so, which ones?
  • How do we set that up so that your peers can be successful participants?

Brainstorm over: Any thoughts on this approach? Anyone else out there teaching an edtech course and care to share?

Image Credit: Civilian Conservation Corps, Third Corps Area, typing class with W.P.A. instructor ca. 1933
National Archives and Records Administration Identifier: 197144