The Digital Journey of A Future Teacher

Technology is something that pervades nearly every part of our lives, including the realm of education. This statement has never been more true after the pandemic hit, forcing schools to take a near completely online format for over a year. It was a tough experience for teachers, but it was fascinating to discover all the digital tools that made the transition easier. A lot of these tools are still being used in in-person classrooms because they have the ability to enhance the learning experience whether it be in an online or in-person format. I am grateful that I had the opportunity in this course to learn about these tools and practice applying them to lessons and activities. Here are a few of my favorite posts from WordPress I made using these tools.

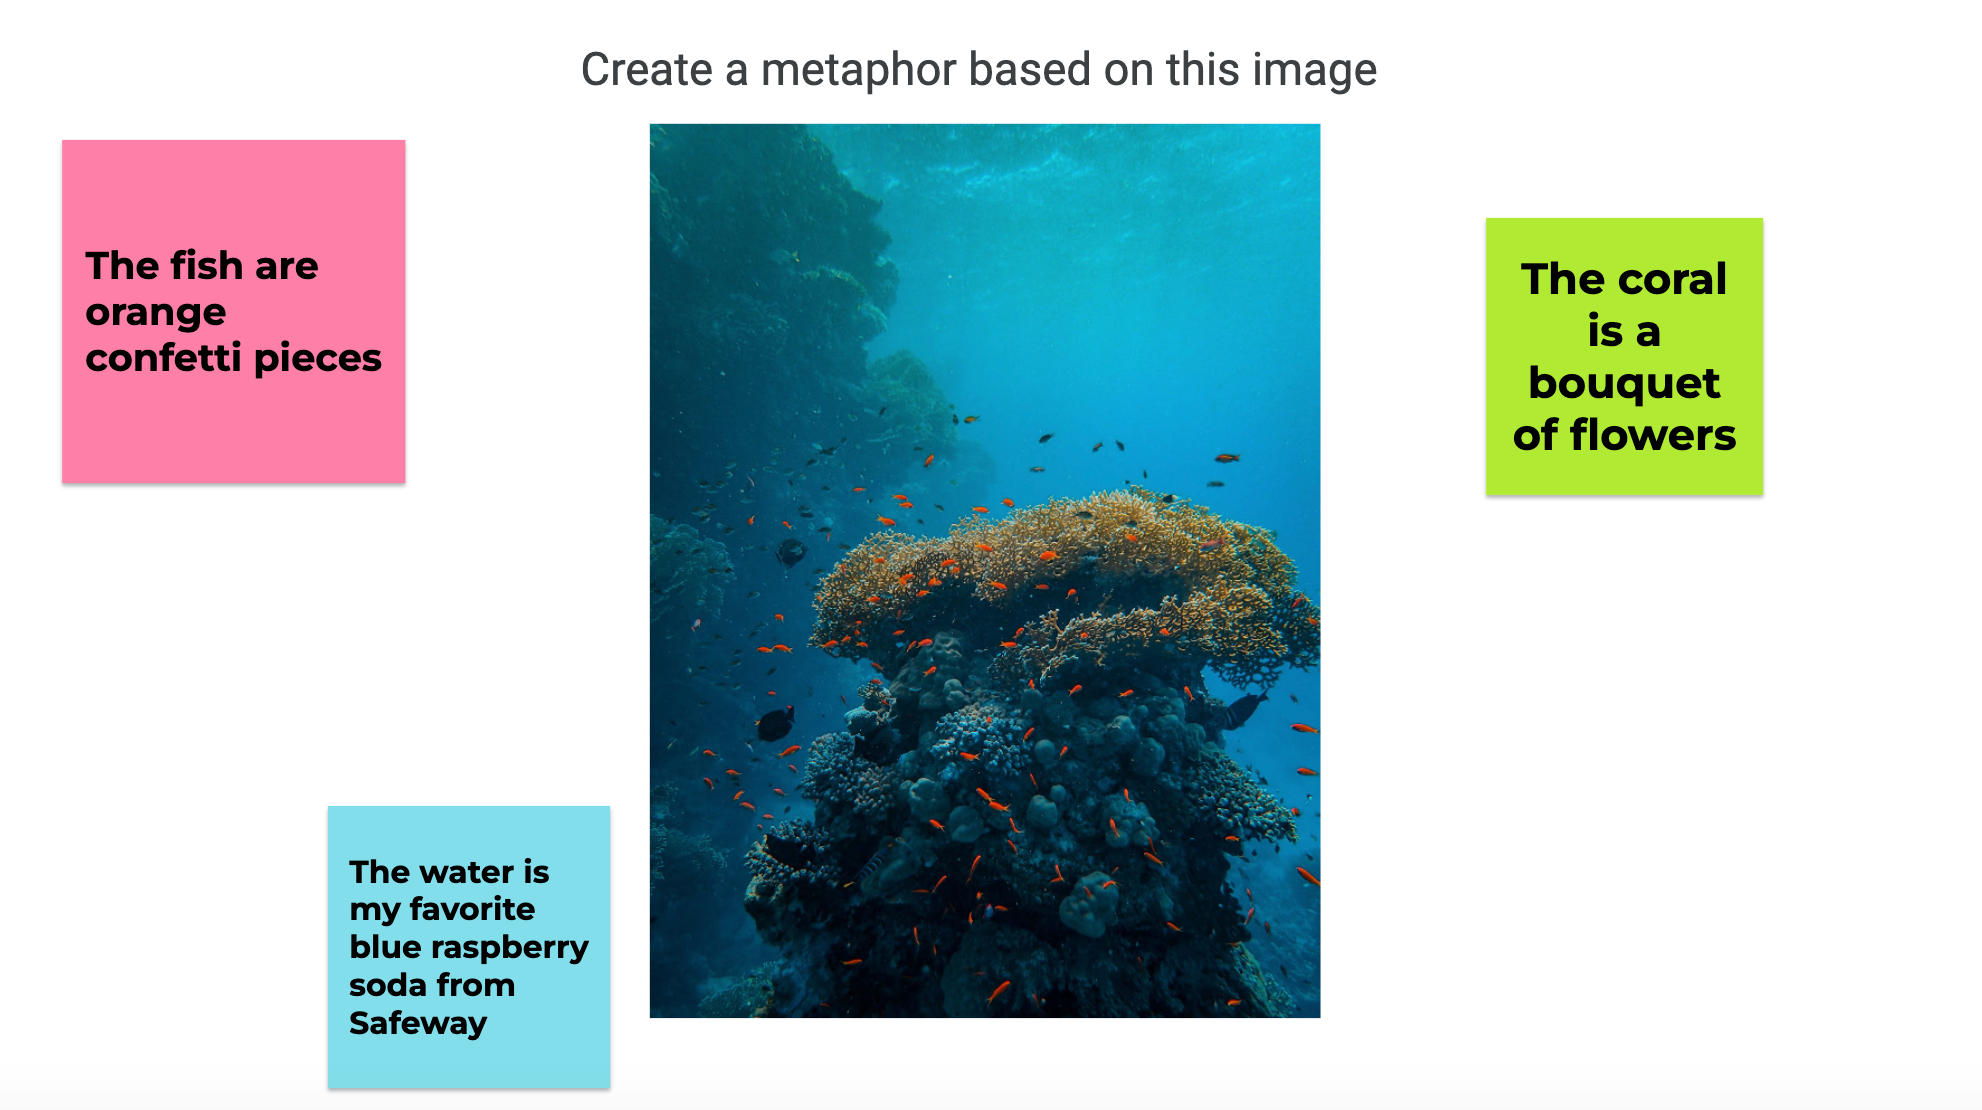
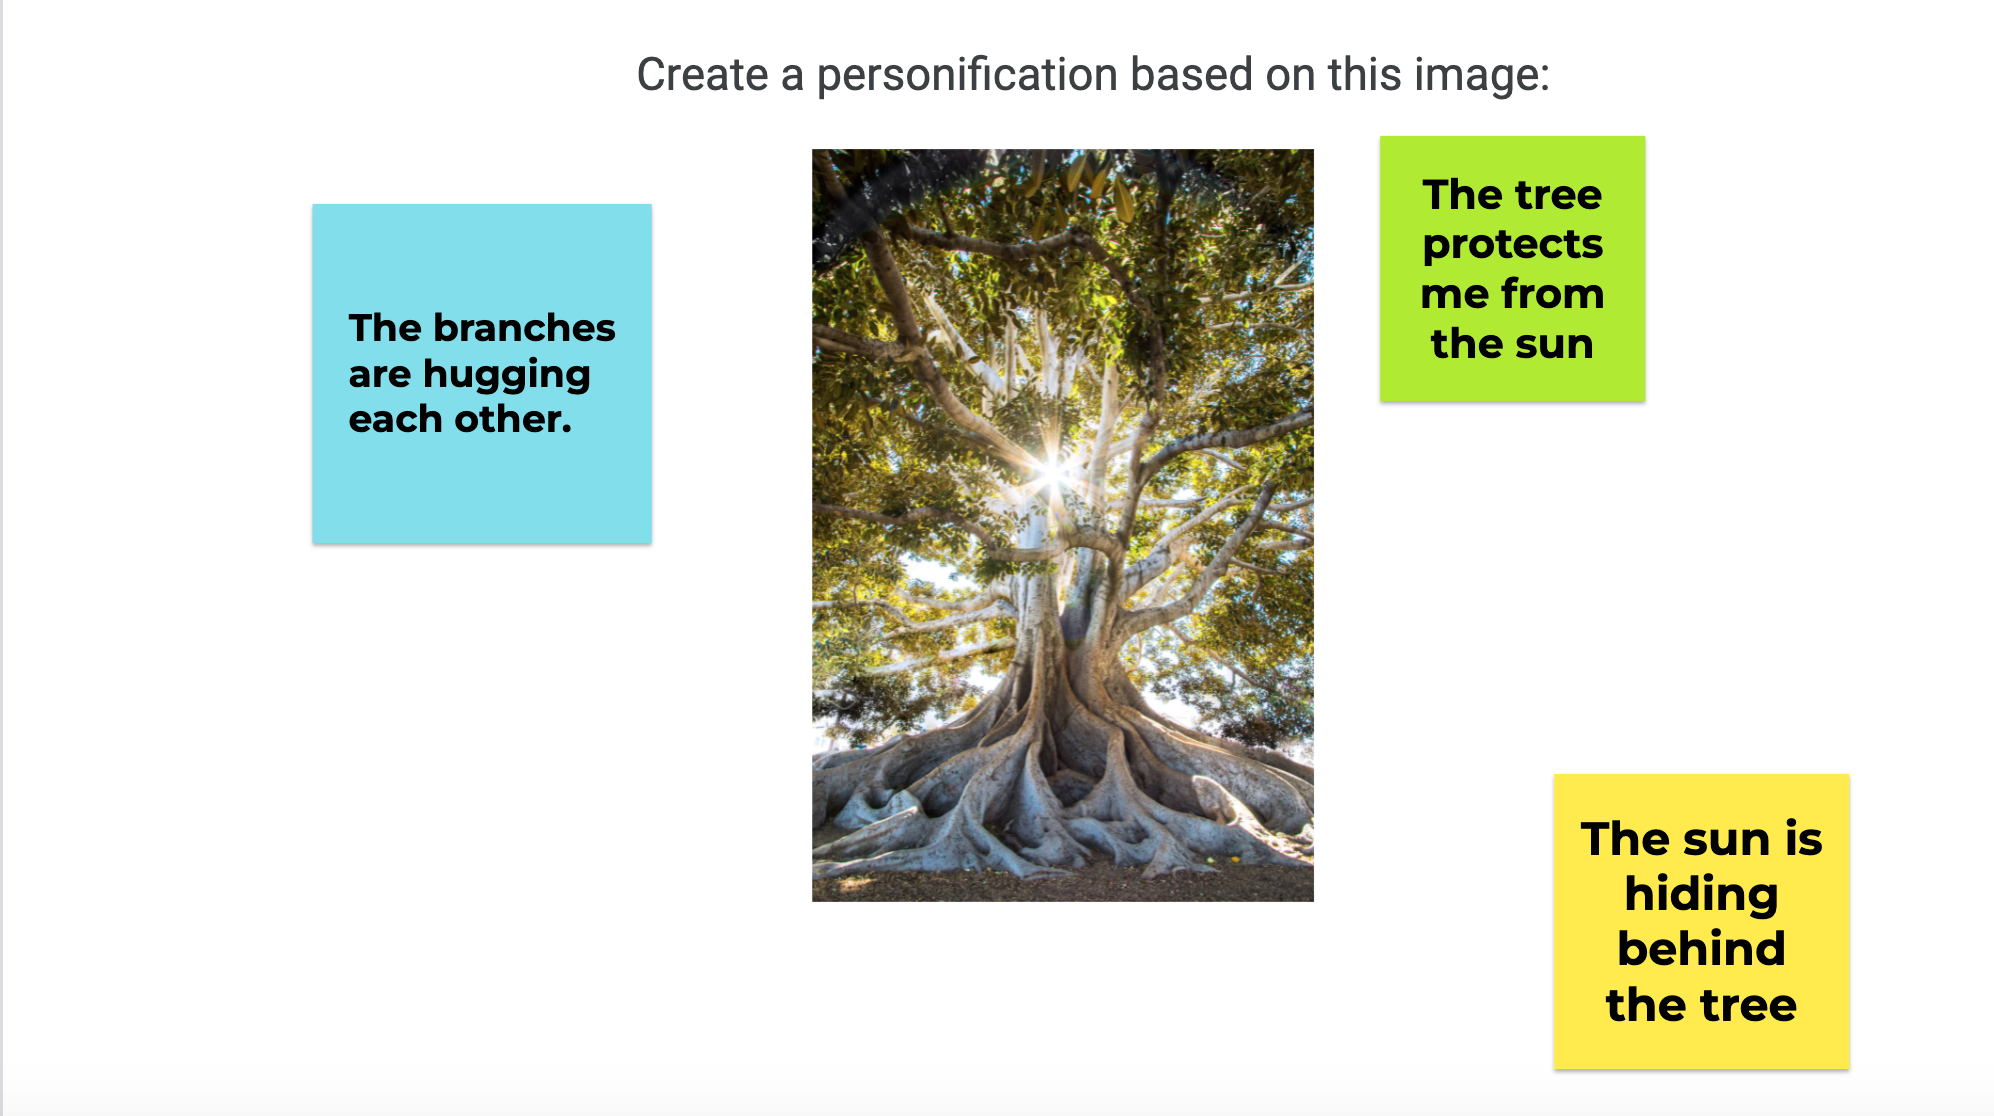
Figurative Language Lesson using Jamboard

In this lesson, I had students use Jamboard as a platform to post their own examples of figurative language based on the images on each slide. I enjoyed the way every student can give their input (it helps that it is done anonymously so no one feels ashamed if they’re not confident with their answers, although this does make it hard to attach accountability to individual students) and can see the examples of their peers. Plus, it was really easy to set up!

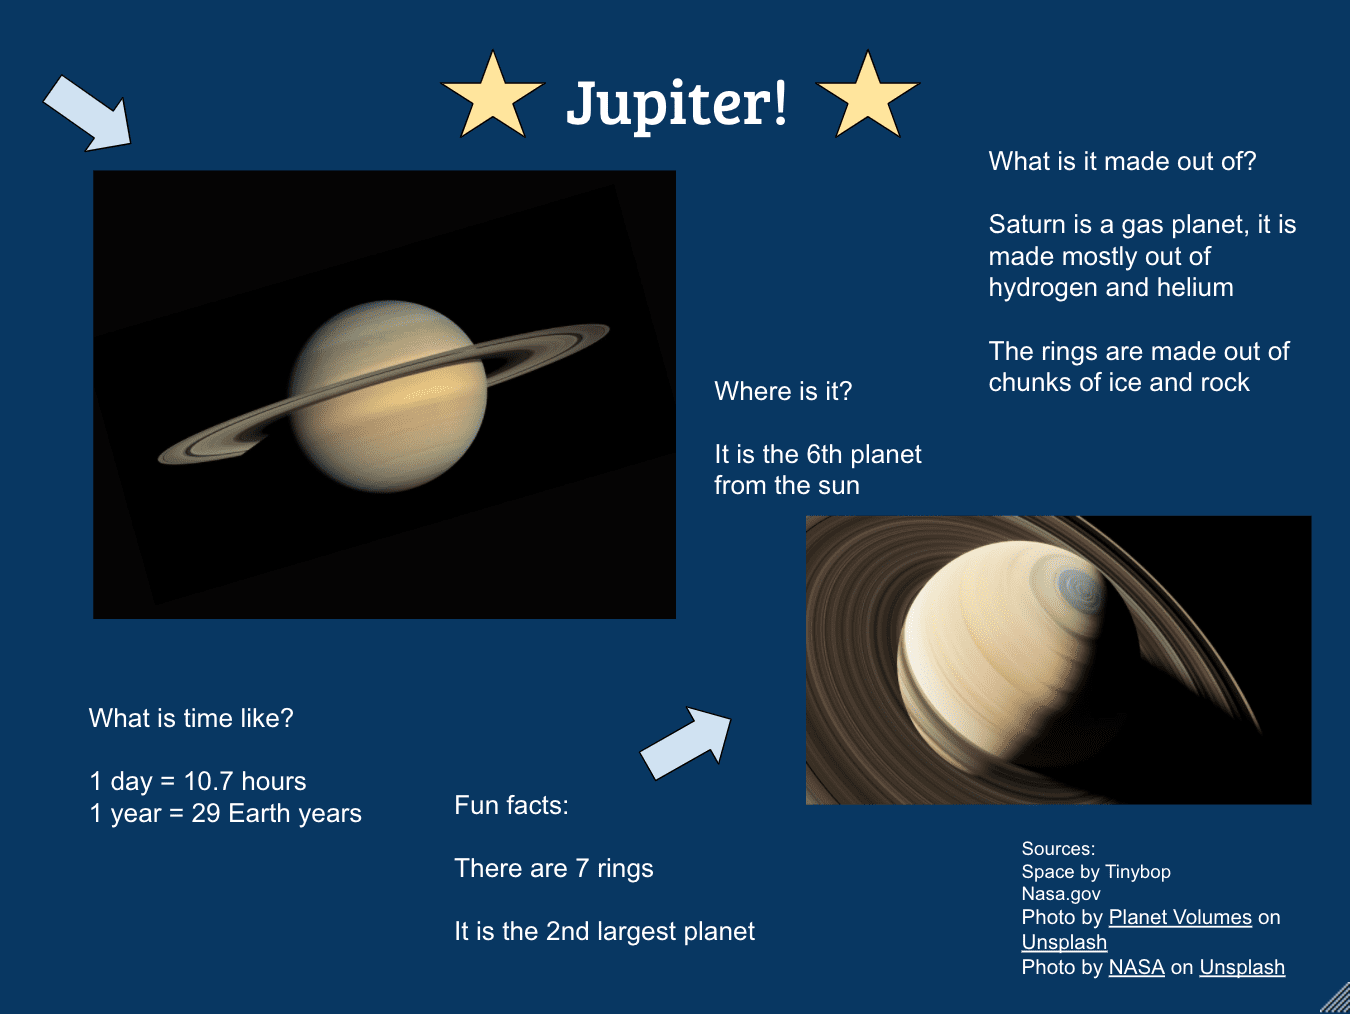
Solar System Scavenger Hunt Using Google Sites

In this lesson, Kate Marshall and I created a website that students would explore and use to fill out a scavenger hunt worksheet. I really enjoyed this activity because it allows students to work at their pace and offers them a great resource they can look back on whenever they need to. I also enjoyed how the activity encourages students to focus on specific details about all the different planets in a fun way without shoving a bunch of random facts into their brains.

Ahupua’a System Lesson using WordPress

This post definitely took me the longest out of all of the posts I’ve made. But the hard work paid off because I’m really proud of it looking back! I like how the lesson can be done by students whenever and wherever because the instructions are all there in the post and directed toward students. Similar to what I said earlier, this online lesson allows kids to go at their own pace and isn’t too demanding or complicated for them to do independently.

Conclusion

After learning and applying so many skills and digital tools throughout this course, I feel much more confident heading into the classroom in a couple of years. However, there’s always more to learn about, and I think another important thing that this course has offered is openness to trying new things. Some tools aren’t that easy to learn and we as educators need to be receptive and willing to put in the work to learn how to use them in the classroom.

Thank you so much for checking out my portfolio! I hope you enjoy my posts.

Featured Image: Photo by Compare Fibre on Unsplash

Let’s Rock with the Rock Cycle!

Grade level: 4th-5th grade

Subject: Physical science

Goal: Students will be able to identify the three types of rocks and how they are formed. Then they will learn how the different formation processes are connected in the rock cycle.

Introduction

Start off the lesson by sharing this Jamboard with the class. This will act as an introduction to the lesson topic, exploring the questions:

  • What are rocks?
  • What are some characteristics of rocks you have seen?
  • Where do rocks come from?

Here are some examples of student responses to these questions:

This introduction can be as brief or long as you would like. Feel free to start a class discussion on these responses if there is time available.

Video

Have students watch the video below that offers a brief description of each type of rock and explains the stages of the rock cycle.

Identifying the Stages of the Rock Cycle

After watching the video, have students work individually on this Google Drawing. Instruct students to fill in the blanks of the rock cycle by dragging the appropriate terms to the boxes.

Create a Website

After discussing the answers to the Google Drawing worksheet, place students into groups of 3. In their groups, they will be creating a website using Google Sites on one of the three types of rocks. It is up to you if you would like to assign the rock types to the groups or have them choose which one they’d like to work on. They will need to conduct research on the rock type and organize the information they find on the site. The website should include:

  • How the rock type forms
  • Common characteristics of the rock type
  • Examples of rocks in that rock type
  • Sources/Work cited page

Here is an example of a student made website:

Debrief on Technological Tools

In the beginning of the lesson, the Jamboard that was used as an introduction allows students to offer their opinions and thoughts in a more accessible and efficient way. It’s also a great way to document everyone’s opinions compared to forming a discussion based on raising hands and calling upon a limited number of individual students.

The Youtube video is helpful for explaining concepts in a concise and visual way. The teacher can also make it accessible on Google Classroom or another class resource site so students who didn’t understand the first time watching or students who were absent can go back and rewatch it.

The Google Drawing was used for students to put their knowledge to the test and label the rock cycle. Doing this digitally prevents the need for printing copies of a worksheet or handing it out during the lesson. And if students make mistakes in their answers, the Google Drawing allows them to easily make changes by simply dragging the terms into the correct boxes rather than erasing and rewriting.

The Google site is a great way for students to organize information. It allows them to add pictures and work together with ease since they can work on the site on their own computer at the same time. The site can easily be shared with others to look at whenever they want.

Featured image: Photo by Oliver Paaske on Unsplash

Adventures of the Galactic Scavengers!

Authors: Kate Marshall and Lannie Hisashima

The target age group for this activity is 4th graders and the subject is science. This lesson is more like a homework assignment that is given after a class session that introduces the solar system but does not focus on each planet individually. And so, the goal of this assignment is to allow students to learn about each planet using a closer lens. Instead of using class time to do this, Google Sites has allowed us to create a homework assignment that students can complete at their own pace of exploration. They will explore our Google Site while filling out a scavenger hunt worksheet (we would supply them with this document in a Google Classroom post). The worksheet would ask questions such as, “Where can you find the largest volcano in the solar system?” or “Where can you find the most suitable environment for life to thrive in our solar system?” To wrap up the activity, we also added a Google Form survey to see how students like the activity and whether it is something that should be done again in the future.

Featured Image: Photo by Guillermo Ferla on Unsplash

Klass Kanji Kollection!

The book I made is a resource for students learning Japanese. I think that this is appropriate for students in middle school and up. Each page focuses on a Kanji character and includes that character’s readings, English meaning, and different Japanese combinations/words you can find it in. Ideally, I would like the students themselves to be making the dictionary, adding to it as they learn more kanji. To make it more organized, I’d probably split the class into groups and have those groups take turns adding to our dictionary for every unit of new kanji introduced (For example, in the book I embedded, the unit would be days of the week and one group would be assigned to create those pages). Alongside the basic information about the Kanji, I would encourage them to use pictures, icons, and other cute designs to make the book more meaningful and personalized. It would be nice if they could insert a GIF of the stroke order, but unfortunately, this book creator didn’t allow me to insert GIFs so I stuck to images instead.

Featured image: Photo by Yifeng Lu on Unsplash

Mapping the Events of WWII

Grade: 9th

Subject: U.S. History

Goal: Students will use the knowledge they’ve gained in class or will conduct their own research to map out important locations of major events/landmarks of WWII. By using MyMaps, they will be able to visualize the events of WWII on a global scale and organize their information.

Hello class! This coming week, we will start our review on WWII to get ready for our unit test. The assignment for this weekend will be the start of our review using Google My Maps. For this assignment, you will need to create a new Google My Maps (you can create this from your Google Drive by selecting ‘New’ in the top left corner, then pressing ‘More,’ and selecting ‘Google My Maps’). For those that are unfamiliar with this site, here is a link to a tutorial video on YouTube, however, it is relatively easy to navigate through without prior experience.

Your Google My Maps should have at least 5 pinned locations that connect to 5 different important events or places relevant to WWII (ex: decisive battles/attacks, military/naval bases, significant concentration camps, places where treaties were signed, etc.). Each of these pins should have the name, date, and a brief description of the event/landmark with at least 3 facts about it included (I encourage you to do some research on your own, but feel free to also use your notes!). We will be sharing these My Maps in small groups on Monday, so be prepared to present your maps informally. I’m excited to see what you guys come up with!

Example of student work:

Featured Image: Photo by Curtis Reese on Unsplash

Okay Students Now Let’s Get in FORMation!

Just a head’s up, this is a late post from the week we focused on Google Forms (as you can probably tell by my title). This has nothing to do with Google My Maps!

My first Google Form (the branching form) would be used as a sort of check-in. It’d be very simple: I’d distribute it every Monday to get a weekly pulse on how students are feeling, how I can help them, etc. I started off the form with a few fun questions simply asking for their opinions of things. And then I ask if they feel like a “good nut” or a “bad nut.” And these would be terminology that we’ve been using throughout the year to describe how we feel. Then the form would go on to different sections; One section would be for those who picked the bad nut and the other for those who picked the good nut. This would be used for elementary students.

My next Google Form is the self-graded quiz. I would have students read the book Guns, Germs, and Steel by Jared Diamond, probably over a long break like Summer. Then I would test them on the big-picture content of the book using this Google Form. I would do this specifically for AP World History high school students.

I think that there are a ton of things you could do with Google Forms. I’ve definitely used it for all sorts of academic purposes, from quizzes and attendance to getting a pulse of the classroom and sign-ups. If you’re planning on doing elementary education, it would probably only be useful for 3rd graders and up, unless the form is very, very simple. Otherwise, I don’t think it’s the best tool for the really young kiddos. I think that secondary education teachers would find Google Forms especially useful since older kids can more easily navigate through it on their own without getting lost/confused.

Featured Image: Photo by ActionVance on Unsplash

Japanese Sentence Structure Practice!

I decided to try a Japanese language lesson for this post since I’m also interested in teaching Japanese one day! Since there’s no specific grade level for learning a foreign language, I decided to make my lesson based on a high school 1st-year Japanese class. The video I created for this post will be a supplementary video for students having trouble learning the basic sentence structure of Japanese.

今日は皆さん!This week, we focused on the basic sentence structure of Japanese and learned the abbreviation “TTPOV” which stands for topic, time, place, object, and verb. I know we’ve been rushing through this lesson, so I understand if there is still some confusion on sentence structure.

Over the weekend, please watch my review video below and use this Google Drawing to follow along! After you’ve watched it, create three unique sentences using TTPOV. You can use the words I supplied in the word bank to get some practice first, but please use your own vocabulary for your three sentences and get creative with it! 頑張って下さい!

I hope you have a restful weekend! I’ll see you in class on Monday! !お疲れ様でした!じゃまた月曜日:)

Photo Credit: Photo by Angga Indratama on Unsplash

Let’s Make Planet Posters!

Authors: Lannie Hisashima, Mykaela Onishi, Elizabeth Lyons-Best

Subject/Grade: Science/4th grade

Instructional Goal: Students will learn about planets in our solar system. They will be able to research an assigned planet and synthesize the information into a poster. They will be able to use the app Space by Tinybop on their iPads to research. They will be able to use Google Drawings on their computers to make a creative poster that includes text and images. 

Lesson outline:

“Alright my fourth-grade scientists, as you know for the past few days we have been learning about our solar system and the planets. Remember our planets include: Mercury, Venus, Earth, Mars, Saturn, Jupiter, Uranus, and Neptune! Now, since we have become more familiar with these planets, you all are going to be split into groups to learn more about planets. I will be assigning a specific planet to each group. Then, you and your group will create a Google Drawings poster to present to the class. Each group will be responsible for creating a poster that includes images of your planet as well as at least five interesting facts that you find about your assigned planet! 

You will be working with your group to research your assigned planet. On your iPads, you will find a new app called “Space by TinyBop.” In this app, you will be able to explore your planet and find many facts about the planet that you can include in your poster.” (The teacher can project the app onto the board to give the students a virtual tour to familiarize them with the app. The teacher can also go over an example of what their poster should look like in Google Drawings.) “Now, you will be splitting off into your groups to research and create your poster!” 

  • Teacher will then assign students into groups and let the students know what planet their group will be working on.
  • Students will have group work time to collect information from the app and create a poster regarding their planet. The teacher will roam the room to answer any questions and monitor student work time.

Note:

  • This research and poster creation may take longer than one class period. Similarly, students will be able to present their poster to the rest of the class during their next science class.
  • If the students do not have access to iPads/Chromebooks, they can conduct research through books within the classroom, handouts from the teacher, and other sources.

Student Tech Resources/Tools:

  • iPads
  • Chromebook
  • Space by Tinybop app
  • Google Drawings
  • Other research material as needed (books, websites, etc.)

How tech resources/tools help students reach their instructional goals: These tech resources help students research and learn about their assigned planet, and organize their research in a comprehensive and visually appealing way.

Sample of a student poster:

Photo Credit: Photo by Guillermo Ferla on Unsplash

I Am From a History That Writes the Future

I am from generations that have cultivated the land

Spring seemingly endless under their guidance 

I am from the scent of pineapples that pervades the car

Even after my grandma has given them all away to her friends

Despite their insistence, “That’s enough, Judy, you gave me some last week!” 

I am from an island of longevity

Carved into my name in case I ever forget 

I am from a line of shining children 

Scribed into our identity as it were not obvious enough 

Without it documented on birth certificates 

I am from friendships that come and go

Easily filled and emptied like tide pools 

I am from the few pools that remained plentiful 

Because I am willing to trek over the intertidal zone 

And fill them up myself

I am from wisdom shaped like shooting stars

Because I’ll only see them if I pay enough attention

I am from days that end with grit and sweat

And the moon beckoning me to rest under her glow

I am from boundless love 

As powerful and life-giving as the Summer sun

I am from a history that writes the future

Shaped by life lessons, resilience, and passion

Shaped by celestial bodies that offer their comfort and treasures

Shaped by earth-bound bodies that carry all of this and me with them

I am from Maui, Hawaii

https://express.adobe.com/page-embed.jsI Am From a History That Writes the Future

I decided to use Adobe Creative because it was very user-friendly when I used it during last week’s class and I enjoy its layout. It’s very simple and easy for me to understand, unlike Sway which confused me when I tried to use it. However, one thing that I didn’t like about Adobe Creative was how the website would display my work differently depending on a person’s tab. And so, it was difficult to plan out my images so that they showed exactly what I wanted. But the focal point function was helpful in this process. I just wish I didn’t have that concern in the first place.

Photo Credit:

Un-forgett-able Affixes!

Hello 3rd graders! For today’s homework activity, we will be reviewing affixes. Let’s think back on today’s English lesson and try to remember what an affix is. Do you remember it? It’s okay if you don’t because we’re gonna review it right now!

Affix: a group of letters that are added to the start or the end of a root word to create new words

We add affixes to all sorts of root words! A root word is simply a base word that can be changed by adding affixes. An affix that we add to the start of a word is different from an affix we add to the end of a word. We have different names for them:

Prefix: an affix that we add to the start of a word

Suffix: an affix that we add to the end of a word

Now let’s review what we’ve learned by listening to this fun song about prefixes and suffixes!

Now that we heard some examples of affixes, let’s do some prefix and suffix practice! Click this link and then press the blue button that says “Make a Copy.” You should see this Google Drawing:

Drag the affixes from the white Affix Bank and place them where you think they belong: the prefix or the suffix side. Think about words you know that have these affixes. Were the affixes at the start of the word? Or were they at the end? Please do not look up answers and try your best on your own! We will review the answers when we meet tomorrow during class.

Featured image: Photo by Sven Brandsma on Unsplash

Figurative Language is as Fun as Recess!

Hello sixth graders! Thank you for working hard during yesterday’s class about figurative language. We learned many new terms together. Let’s review them here:

  • Simile: a comparison between two things using ‘like’ or ‘as’
    • “He ran like a cheetah.”
    • “After a day at the beach, my face was as red as a tomato.”
  • Metaphor: a comparison between two things without using ‘like’ or ‘as’
    • “He was a cheetah when he ran.”
    • “After a day at the beach, my face was a red tomato.”
  • Personification: Giving human qualities to non-human things
    • “The flowers danced in the wind.”
    • “The stars in the sky winked at me.”

There are many other types of figurative language, but these are the three we will be focusing on this week. For today’s homework assignment, you will create your own similes, metaphors, and personifications! First up, we have similes.

Similes

For our similes, we are going to take inspiration from the image below. Look carefully at the image and focus on any details that stand out to you. You can focus on colors, shapes, emotions, and anything else you notice!

Photo by Luca Micheli on Unsplash

Use this Jamboard (click here for the link!) to write down the simile you created on slide 1. Please be respectful of fellow your classmates’ responses! Here are some of the similes we have so far:

Metaphors

Next, we will create metaphors. Remember, metaphors are like similes because they both compare two things. However, metaphors do not use ‘like’ or ‘as’ because they are direct comparisons. Let’s use a new picture to spark some ideas for our own metaphors!

Use the next slide of our Jamboard to write down your metaphor. This will be on slide 2. Be creative and feel free to use the examples from your peers if you are having trouble making your own! Let’s look at some metaphors our friends wrote:

Personification

The last type of figurative language we learned about is personification. Use the image below to create one! Look for any part of the tree (this can be its branches, roots, and leaves) or the sun that looks like it is doing something that humans normally do.

Once you have your personification, add it to slide three of our Jamboard. Personifications can be difficult to make, so do not worry if you’re having trouble. Just try your best and have fun with it! Here are some examples of personifications we’ve written so far:

Conclusion

By the end of this activity, you should have created a simile, metaphor, and personification. Figurative language takes a lot of brainpower, huh? But it makes reading and writing way more interesting and fun! Tomorrow, we’ll continue reviewing figurative language, so don’t worry if you’re still a little confused about it. We’ll also look at the finished Jamboards to read all the awesome things we wrote! Great job, friends!

Featured image credit: Photo by Vika Strawberrika on Unsplash

A Relationship in Metaphors

Technology is an ever-present existence in everyone’s lives, whether they like it or not. Even when we’re not using technology, we all receive the influence and effects of it, positive and negative. In everyday life, it is not the most common activity to analyze one’s relationship with technology. As this is a rare opportunity for me to do so while feeling productive knowing it is for a school assignment, I will try my best in this reflection!

I have decided to structure this analysis in the form of metaphors that represent different aspects of my relationship with technology. To start things off, I will reflect on technology in regards to my everyday life.

Photo by Priscilla Du Preez on Unsplash

Technology in Everyday Life: Clothes

When going about my daily routine – getting ready, going to classes, hanging out with friends, etc. – technology feels like clothes. Of course, this has nothing to do with the physical texture or material of the two. Rather, technology is something as essential as clothes to me, and when I don’t have it, I feel exposed and vulnerable. However, when technology is at my convenience, I start to forget how important it is to me after a while. This is similar to how our skin grows accustomed to the sensation of clothing against it, touch receptors desensitized to the material.

I have a strong dependency on technology in everyday life. If I were stripped of my phone, computer, and other devices, I’d feel insecure and out of place, as if my connection to the world was severed. Well, the digital world is a better term for it, but sometimes the digital world can feel like our entire world. I am aware that this mindset may not be the healthiest and I should work on relieving my dependency. However, I am sure that I am not alone in this experience, which may be even scarier to think about.

Technology and Social Media: A Child

This may sound odd, but my relationship with social media reminds me of a relationship between mother and child, me being the mother and social media being the child. This may seem counterintuitive to my earlier section where I claimed I had a dependency on technology rather than the other way around. However, when it comes to social media, it feels like a child that requires much of my attention throughout the day. Like many mothers who thrive off of caring for their child, sometimes I feel like social media gives a sense of completeness to my day. If I don’t interact with social media for a while, it starts to feel unnatural. But on the other hand, caring for a child can be extremely draining. The same can be said for my situation; Dedicating my focus to social media for too long can make me feel fatigued and almost…icky? I’m not sure if that’s the right word for this, but it’s a gross, slimy feeling as if my brain has melted into mush. I don’t think that feeling is associated with babies, though.

But social media – and children – are not all that bad. They can give you a sense of connection to others. For social media, this connection can be with close friends or strangers from all over the world. And as for the latter, you can connect foremost with your child, but also with others who are experiencing the life of parenthood and with the person you may be co-parenting with. Okay, I’ll stop trying to drag out this metaphor because I feel like it’s not making sense anymore.

Technology and Entertainment: Candy

Entertainment falls under a similar category of technology as social media. However, they feel quite different to me. Instead of a dependent child, entertainment is like candy.

Maybe I should specify what kind of entertainment I like first. I read a lot of webtoons, manga, novels and occasionally enjoy a TV show or game if I find one that is particularly interesting. I am quite picky with what I choose to entertain myself with, similar to how I am a picky eater with everything, including candy. However, when I do find something that fits my taste, I become very happy and almost giddy, knowing that I’ll be satisfied until I’m done indulging in my recent findings. Then I continue to search for more.

Just like my experiences with social media, though, too much entertainment can be overwhelming. On days when I can do nothing for its entirety (exclusively in the Summer), I become tempted to just lay down in my bed all day, reading webtoons or novels until the sun goes down. There have been a few times when I did exactly that only to end up with a headache and tired eyes from staring at a screen all day. Even my brain became muddled after reading so many stories and losing touch with reality for such a prolonged time. This reminds me of eating too much candy; your tongue becomes cloyingly sweet, your stomach feels full yet empty, and you know that you haven’t gotten any nutrients out of it.

In Conclusion

There are so many other aspects of my relationship with technology I could cover, but I will hold back so that I do not bore you with an unnecessarily long post. But overall, it was fun to think of metaphors that could represent my experiences with technology. It put things into a different perspective and forced me to work harder as I tried to explain my reasoning behind them. I recommend trying to do this as well if you have the time and interest!

Featured image credit: Photo by Maxim Ilyahov on Unsplash