Writing and Revising Opinion Pieces

Opinion picture by Steve Johnson on Unsplash

This lesson is for second-grade students to practice forming, defending, revising, and publishing their opinions in writing.

Standards:

CCSS.ELA-LITERACY.W.2.1
Write opinion pieces in which they introduce the topic or book they are writing about, state an opinion, supply reasons that support the opinion, use linking words (e.g., because, and, also) to connect opinion and reasons, and provide a concluding statement or section.

CCSS.ELA-LITERACY.W.2.5
With guidance and support from adults and peers, focus on a topic and strengthen writing as needed by revising and editing.

CCSS.ELA-LITERACY.W.2.6
With guidance and support from adults, use a variety of digital tools to produce and publish writing, including in collaboration with peers.

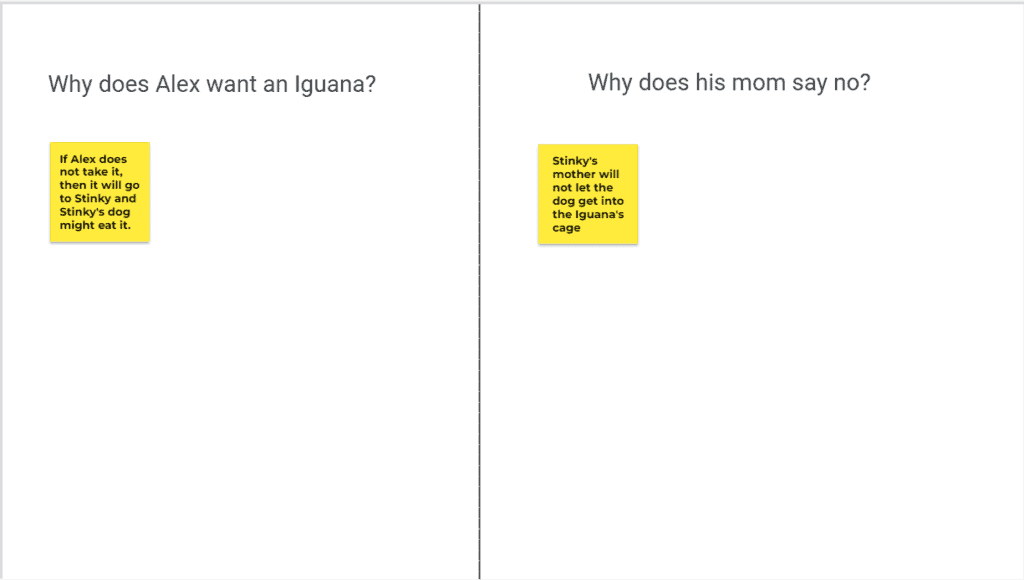
First, the teacher will read aloud a text on opinions. In order to highlight how the letters communicate effective option pieces on why Alex believes he should get an Iguana and why his mom believes he should not have one, students will collaboratively fill out the following Jamboard to find opinion piece tools.

A few other options for opinion picture books include:

  • I Will Never Not Ever Eat a Tomato
  • I Don’t Want to be a Frog
  • The Day the Crayons Quit
  • The True Story of the Three Little Pigs
  • The Perfect Pet
  • Don’t Let the Pigeon Drive the Bus
  • Click, Clack, Moo Cows that Type

Then, students will fill out the following Google Form to see where they stand on statements and start generating ideas on what they would like to write their opinion piece on. Students will rate their opinion on a 1 to 5 scale of strongly disagree or strongly agree. Places, where they mark either a 1 or a 5, are places where they are encouraged to write about (or pick their own opinion statement to work on). The Form’s questions are not meant to be a comprehensive list of opinions to write on, but rather a starting point for students to pick what is important to them.

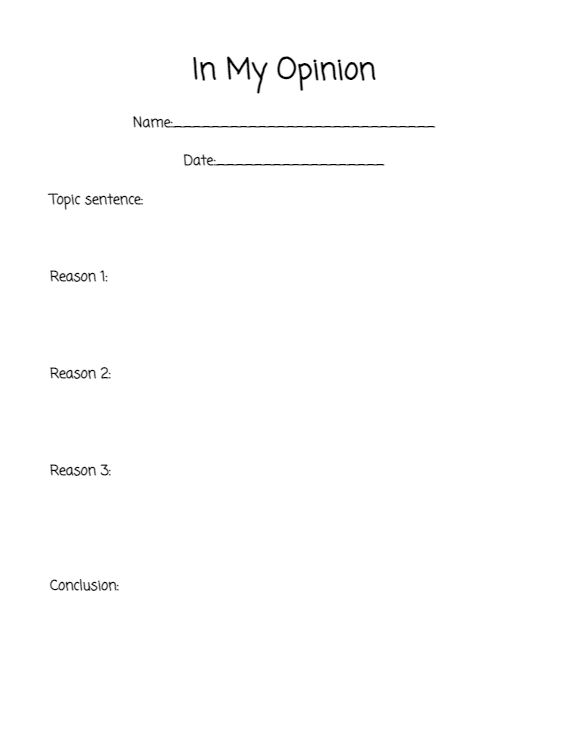
Then, students will work with Google Docs to write their first draft of their opinion piece. Clicking on the Google Doc below will have students make a copy of the page so each student is able to edit and add their work for their first draft. Students should use the example sentence starters/ transitions gathered on the Jamboard or ones that the teacher will present below:

Example sentence starters:

  • I feel…
  • I think…
  • I belive…
  • I think ______ is better than _____.
  • The worst part about _____ is _______.
  • The best part about _____ is ______.

Example transitions:

  • First,
  • Next,
  • For example,
  • Most importantly,
  • Additionally,
  • For instance,
  • In other words,
  • In conclusion,
  • Finally,
  • To summarize


Then, students will share their work with another student in the class via Google Docs who will peer edit their work to ensure their argument and evidence are clear and convincing.

Finally, students will publish their piece on Book Creator making sure that they have a page with their topic sentence, a page per piece of evidence, and one for their conclusion with any pictures, videos, or drawings they prefer to back up their claim.

See the source image

ABC Book Time

Alphabet Picture by Geralt on Pixabay

For this lesson, Kindergartens will use their knowledge about the alphabet book to make their own ABC book. This lesson will come after students have gone through the alphabet with each letter of the day’s lessons so they know the corresponding words for each page.

Students can choose their own words or use the example book for reference. Once picking their words students will look up stock photos, draw a picture, or take a picture of something around them that starts with the corresponding letter.

Then students can add to the book throughout the year as they learn new words. This allows students to apply their knowledge in a way that makes sense to them and the book can be a work in progress as a reference point throughout the year. This is also a fun way for students to learn how to use Book Creator for future projects throughout the year/in their future education.

Here is an example book that students can see. It also includes an alphabet video for students to watch.

Descriptive World Writing

Map Photo by Kelsey Knight on Unsplash

This lesson is for third graders to practice their descriptive writing. Students will pick a landmark, city, or destination from one of the flagged markers on the attached MyMaps page (or find their own) and use the photo to write a descriptive paragraph about it (without using the landmark’s name) to see if their classmates can figure out what they are describing.

After picking their location, students will have 30 minutes to research, explore the photo, determine essential details, write and edit their descriptive paragraph. Students will want to make sure they use enough descriptive words to paint a mental picture in their audiences’ minds without outright saying the location’s name.

Then students will work in groups to read out their paragraphs and see if the group members can guess what location they are describing. All students have access to the MyMaps for hints, but students can pick their own location not tagged in the post to make it trickier.

This activity will allow students to practice descriptive language and see how people interpret their writing.

This activity could stretch longer if students want to revise their initial paragraph after their first presentation to add or change their location description and then try again with another group.

MyMaps was great to use for this lesson because it allowed me to build a map with pictures and location titles quickly. I could also write a description of each place for the student if I were doing the lesson for younger kids that include grade-level friendly vocabulary. MyMaps allows students choice to pick their location from the pinned spots or select their own.

Exploring Diphthongs

Letter photo by Jason Leung on Unsplash

This lesson is for first-grade students to practice what they have been learning in their phonics lessons with diphthongs.

First, as a class, read the book Look by Fiona Woodcock to review the diphthong /oo/. This book is composed strictly of oo words. If you are reading the book to students, read the first few pages without introducing the pattern and see if students catch it on their own.
Here is a read aloud option if you do not have the book:

The reading starts at 2:50.

After the read-aloud, have students stand up to sing along to the Jack Hartman video. Instruct students to sing along the first time and move their bodies as they would like. Remind them that the second time they watch it they will get to practice diphthongs on their iPad.

After watching the video once as a class, students will go to their iPads to record themselves saying each diphthong and reading the words back using the voice recording feature on edpuzzle. The voice recordings are during the second half of the video so students have another chance to hear the words before repeating the sounds back.

Here is a link for the video in case the HTML embedded link does not work.

After students have finished their voice recordings for diphthongs, have them return to the carpet and thing of words that fit under each diphthongs /oi/, /oa/, /au/, /ue/, /oy/, /ow/, /oo/, /ew/. The teacher should record students thinking for each word and the anchor chart can be displayed in the room for students to reference and add to in the future.

Fun Ways to use Google Forms in the Classroom

Classroom photo by National Cancer Institute on Unsplash

The first Google Form I made is a quiz for students to take to get to know their teacher. I made the questions silly and fun so students could get to know me as a person while practicing their test-taking skills. After students take the quiz, they can create their own “how well do you know ___” quizzes that the rest of the class can take. I pictured this activity during the beginning of the day while students are getting settled or during the day as a fun brain break from lessons. It is a great way to build classroom community while letting kids be silly.

The second Google Forms quiz that I made is a silly never-ending quiz for students to take. This quiz could be given at the beginning of a period, the teacher could make it seem like a big deal and instruct the students to work in complete silence. Tell them that they can only finish once they press the submit button (which they will not get to) Then, see how long it takes for the students to see that they are being tricked into a silly quiz. I had the questions start out with one topic and then get broader and more random. Some even have students make a sound or movement but are not allowed to say anything to a partner. I think this would be a fun way to relieve testing anxiety and keep humor in the classroom. It could also be a fun April Fools joke.

I like how Google Forms are easy to make and I learned a lot about the different types of questions, how to make self grading quizzes, and the opportunities that are possible using Google Forms.

Finding Classroom Angles

Featured image angles photo by Spencer Davis on Unsplash

By Marlee Bennett and Kasidy Honnaka

Standards: Draw and identify lines and angles, and classify shapes by properties of their lines and angles.

CCSS.MATH.CONTENT.4.G.A.1
Draw points, lines, line segments, rays, angles (right, acute, obtuse), and perpendicular and parallel lines. Identify these in two-dimensional figures.

CCSS.MATH.CONTENT.4.G.A.2
Classify two-dimensional figures based on the presence or absence of parallel or perpendicular lines or the presence or absence of angles of a specified size. Recognize right triangles as a category, and identify right triangles.

Target student group: 4th-grade math

The instructional goal of the lesson: Students will be able to identify angles in the real world.

Outline:

Okay, mathematicians, please join us on the rug for math time! Today we will be reviewing our work on angles in the world. Let’s first watch this video!

Can everyone hold up your arms to show me an acute angle? Great! An acute angle is less than 90 degrees! Can you show me an obtuse angle? Yes! An obtuse is bigger than 90 degrees and smaller than 180 degrees. I am seeing lots of big arms! Finally, can you show me a 90 degree angle with your arms? Nicely done!

Not only do we see angles in math, we can also find them in the world around us!

To practice, please get into pairs for a scavenger hunt! I am going to share a Jamboard with you all and I want you to work with your partner to find examples of acute, obtuse, and right angles around the classroom. When you find one, take a picture of it, put it in the Jamboard in the correct category.

Click on the image to access the Jamboard.

Great job! I challenge you to find three more angles at home today and then tell me about them tomorrow!

This activity helps students identify and compare learning to real-world objects rather than just practicing on a worksheet. If the teacher/students wanted to take learning to the next step they could practice identifying the degree of each angle.

I am From the Emerald City

I am from the emerald city,
From forbidden unbrellas, 
And sacred coffee.

I am from mountains and oceans,
From clouds and rain,
And from everything green.

I am from Alki Beach and Lincoln Park,
From cold water swims,
And reading in trees.

I am from community block parties,
From running into someone you know at the store,
And asking for sugar from a neighbor.

I am from a city who raised me,
From the community and village,
And my heart will always find a way home.
Sleepless in Seattle
https://express.adobe.com/page/H9WiQtzfkHDlr/

What I liked about Adobe:

I have a little bit of experience with Adobe from photoshop and lightroom so it was fun to explore a new tool. I like that they have so many creative options when creating something new! I found the web page setting easy to figure out. I really liked that you could search for free images and Adobe credits the photos automatically at the end of the post.

Using Google Drawings for Place Value

Featured image photo by Annie Spratt on Unsplash

This lesson is designed for a first-grade math class for the following standards:

CCSS.MATH.CONTENT.1.NBT.B.2
Understand that the two digits of a two-digit number represent amounts of tens and ones. Understand the following as special cases:

CCSS.MATH.CONTENT.1.NBT.B.2.A
10 can be thought of as a bundle of ten ones — called a “ten.”

CCSS.MATH.CONTENT.1.NBT.B.2.B
The numbers from 11 to 19 are composed of a ten and one, two, three, four, five, six, seven, eight, or nine ones.

CCSS.MATH.CONTENT.1.NBT.B.2.C
The numbers 10, 20, 30, 40, 50, 60, 70, 80, 90 refer to one, two, three, four, five, six, seven, eight, or nine tens (and 0 ones).

For this lesson, first have students watch the video below.

Then, have students work in pairs to solve the Google Drawing below. Each group should get their own copy so they can move the place value blocks together.

Click on the photo to access the Google Drawing

Finally, have students go on a scavenger hunt around the classroom with their partner to see what other groupings of numbers they see. Collect a few ideas on the board when finished so students’ can share their work.

This lesson allows students to think of number pairings through a song, through block manipulative, and through applying it into daily life in a scavenger hunt.

Social Emotional Learning with Jamboard

Featured image by Gino Crescoli from Pixabay

This lesson is designed for kindergarteners to practice using the SEL emotional regulation colors.

It follows the Oregon Standard 4: Students will demonstrate the ability to use interpersonal communication skills to enhance health and avoid or reduce health risks. Specifically the kindergarten standard: HE.4.K.1 Identify healthy ways to express needs, wants, and feelings. 

This lesson assumes kids already have previous knowledge of the four emotion zones and allows them to practice through a read-aloud, drawing, partner sharing, and generating a class list. Click on any of the images to access the Jamboard. Jamboard allows students to have ownership of their own slides and creation in a virtual setting. It also allows for easy sharing because anyone with the link can access the information.

First, watch or read the book ‘The Bad Seed’ by Jory John

Then pull up the Jamboard on the teacher’s screen (without sharing the link to the students) to review the four core emotions and some strategies that people can use to move back to green.

Ask the students what color they think the bad seed felt at the beginning and end of the book. Generate some ideas about what the bad seed did to move to green on the whiteboard.

Then, share the Jamboard link with the students and have them identify what color they are currently feeling on slide #2.

SEL emotion student check-in


When finished, have them each find their slide (the teacher should put students’ names at the top of each slide before the lesson) and draw themselves as the bad seed and some strategies they would use to move back to green. Students can reference slide #1, the whiteboard, or the example slide on #3 for examples.

examples of emotional regulation to get to green.
Teacher example of a bad seed self-portrait and personal strategies

Once finished drawing, have students share their images with a partner and explain their strategies. The teacher will then gather students’ ideas on the last slide.

Gather class emotional regulation strategies here to have something to reference back to in the future.

My Tech Timeline

Tech board photo by Alexandre Debiève on Unsplash

A 2022 time capsule of the ways technology has influenced my life through the years.

Thinking back to the last 10, 20, and 40 years, technology has evolved exponentially. It is hard to imagine what future tech will bring. Will we finally get flying cars? Will we even have in-person schools or will kid get instruction from robots?

Here is a small compilation of my daily technology so in 10, 20, and 40 years in the future, students can say, “Ms. Bennett, your phones really had buttons on it at one time?” and “Ms. Bennett, did you really have to use cords and wires to charge and connect things? That is crazy!”

2000

Starting in the 2000s era, iTunes, Wikipedia, Microsoft Windows, and Xbox were just beginning. Blue Ray, DVR, and Facebook hit the streets for users to access information in new and improved ways.

I remember using VHS tapes to watch Disney movies all the time. We had a big TV downstairs, about as wide as it was across. Sometimes it would stop working and I was a professional at hitting it in the right spot on the side to get it started again. The great part about VHS takes was that if you took the tape out of the player, it would save your spot, and you could resume another time. However, that also means that viewers had to rewind the film once the movie was over to get to the beginning. On special occasions like a birthday party, we could walk to the local blockbuster to rent a new movie.

My parents were still using film cameras where you had a limited number of shots per film roll before sending it off to be developed. We still have boxes of photos that my mom developed and printed to use for photo albums sitting around downstairs.

2005

Blackberry phone photo by Alejandro Mendoza on Unsplash, iPhone photo by Jonas Vandermeiren on Unsplash

In 2005 Youtube was created and Twitter a year later. Apple released the first iPhone in 2007. The draw that kids have to phones is not limited to the current generation of kids. I remember wanting to play on my mom’s work Blackberry phone so badly even though it did not have any games. The new technology was much more fun than her personal flip phone that she also carried.

Around this time my parents got their first digital camera which allowed them to take unlimited photos. This allowed them to take more photos at one time, see them right away, and print only the desired photos.

At my house, we had a CD player that held upwards of 500 CDs. It connected to two speakers in the house and we would have it on shuffle all the time. Our house was filled with the sounds of everything from classic rock to Jack Johnson.

2010

iPod Shuffle Photo by Glen Carrie on Unsplash, iPod Photo by Madhukar Dwivedi on Unsplash,

While the iPod was officially released in 2001, I got my shuffle around the 2010 era and then upgraded to a used iPod Nano a few years later. The shuffle you could actually shake to “shuffle” your songs, and the Nano had solitaire downloaded, so I spent hours playing with the little screen. My babysitter helped me transfer music from mixtapes onto iTunes where I then downloaded it onto the iPod- all on the home desktop computer of course. Neither device had a speaker so users had headphones (with cords to connect).

My personal technology was limited to my iPod, the home computer, and the TV in the living room. I was on the cusp of the iPad generation but my parents deliberately chose to not allow excess technology to promote independent play and hobbies.

2015

Photo by Le Buzz on Unsplash

In 2015 I got my first iPhone and was active on Instagram. I remember posting my first selfie was so excited to receive 10 likes from my cousins, a few friends from school, and my mom. I also used Snapchat, Youtube, Tumbler, Pinterest, and Facebook (to keep up with my grandma).

The draw of food pictures, cat videos, and inspirational stories quickly hooked me on the endless scroll of social media.

2020-now

Now, at arguably the height of social media, there is hardly a day that I don’t go on Instagram, TikTok, Netflix, or other platforms. My phone and AirPods come with me on almost every outing and I stare at a screen for hours a day. I use my digital camera with a 128 GB memory card to take as many photos as I want and not worry about storage. My laptop and Bluetooth mouse allow me to edit photos, attend classes, and work on papers where ever and whenever I want.

As for technology in the home, we finally got rid of our landline home phone before the 2020 election to avoid the election spam phone calls. My mom had been holding on to the landline so there was always a way to reach one of us at home but ultimately the advancement of technology won and the phone became unused and just another bill. \

Modern technology often comes at the cost of privacy. Similar to the Truman Show, our movement, actions, and beliefs are pretty much all accessible. Through social media people often share personal beliefs At my college house we have a Ring Doorbell camera that is connected to all of the roommates’ phones. This allows us to track who is coming and going and what packages we receive. This security means that any roommate can see who is coming and going for better or for worse. I also share my phone location with my roommates and family. Again, while it allows security because people know where you are, there is no privacy.

However, with all that said, I do not think the technological era is all bad. Social media and technology often bring people together, present people with new information and opposing views, and make life more accessible. Looking back on the evolution of technology over the last 20 years, I look forward to what the future will bring and what it means for education.

The Lifecycle of Butterflies

Butterfly on orange flower photo by Calvin Mano on Unsplash

A kindergarten science lesson.

To get started, draw three columns on the whiteboard or a projector device. Ask students what they know about butterflies and write the ideas on the left column on the whiteboard to activate prior knowledge. Allow all students to share. This lesson is based on students’ questions and so encourage curiosity and push students’ thinking.

Show the video below describing the phenomena of a butterfly’s lifecycle. Pause the video at 1:30 and ask students what they predict will happen next using the information generated from their prior knowledge.

A video description of a butterfly’s lifecycle.

Next, add two more columns onto the whiteboard. Next to prior knowledge write ‘Notices’ and ‘Wonderings’. Ask students what they notice and wonder from the video. Write every response down on the board- make sure that students know there is no right or wrong response.

Using students’ ideas, explain that today we are going to answer their questions regarding a butterfly’s lifecycle!

Using the images and talking points below, go through the lifecycle of butterflies with students making sure to come back to their notices and wondering as questions get answered along the way.

First Stage of a Butterfly

All butterflies go through a complete metamorphosis- they go through four life stages. A butterfly’s life starts in a small round or oval egg. The eggs are often found on the leaves of plants. It can take a few weeks for the butterflies to hatch from the egg.

Second Stage of a Butterfly

A Caterpillar’s Diet

Once a butterfly hatches, the butterfly comes out a caterpillar and they eat a ton! They start by eating their way out of their egg and then they start eating the leaf they were born on!

Photo by Sara Codair on Unsplash

Can you guess what foods from the ‘Very Hungry Caterpillar’ book, caterpillars do not eat? Caterpillars do not eat desserts like lollypops and pies. In fact, each caterpillar type only likes to eat a certain type of plant so it is important that the mother butterfly lays her eggs on the right leaves.

However, like the book, caterpillars do grow very quickly. Their food helps them grow! Caterpillars grow by shedding their molting their outgrown skin because their exoskeleton (skin) does not stretch as they get bigger. Kind of like how kids grow into new clothes as their body changes, caterpillars shed their skin through molting because they grow quickly from eating.

Third Stage of a Butterfly

Photo by Suzanne D. Williams on Unsplash

Once the caterpillar is done growing, they form into a pupa (aka chrysalis). where the caterpillar rapidly changes through a system called metamorphosis. The caterpillar stays in the pupa for one to two weeks. The shell of the pupa is the same color as the leaves or branches around it. What color leaves do you think were around the pupa above? Why do you think they are the same color? Could it be to hide from predators?

Fourth Stage of a Butterfly

Once the caterpillar finishes changing inside a pupa, it emerges as an adult butterfly! When the butterfly first comes out of the shell, it has to rest because its wings are very wet. To dry their wings, butterflies hang upside down. Once the butterfly is able to fly, it goes off to look for food and for a mate. Then the butterfly lays eggs to start the lifecycle over again!

Look at the before and after of the butterfly in the chrysalis and after it is out. What do you notice? What similarities and differences do you see?

Photos both by Joshua J. Cotten on Unsplash

Adult butterflies come in lots of different colors, what colors do you see? Have you seen butterflies in other colors? How do you think their colors and patterns help them live in their habitat?