Creativity with Technology

Throughout high school and during my first year and a half of college I despised the idea of students using technology within the classroom on a regular basis. I was under the impression that technology took away the creativity and imagination that students should have, while at school. While I still prefer more interactive and hands-on types of lessons, I have come to the realization over the course of this class that there are numerous ways to engage technology within lessons that still allow students to showcase their knowledge, creativity, and individuality. Not only that, but there are many ways that I will now be able to implement technological resources into my own classroom that will make the learning fun and interactive for the students. Since the beginning of COVID-19, schools have needed to adjust to online platforms. While we are back to (semi) “normalcy” in the classroom setting, it is important to have these resources and it has made teachers more well rounded to keep up with the times. Instead of dreading the implementation of technology in my future classroom, I have come to embrace it and use it whenever I can. Over the course of this class, I have learned many new ways to implement technology in my future classroom. Below are a few of the lessons that I have been able to construct over the semester.

Google Forms

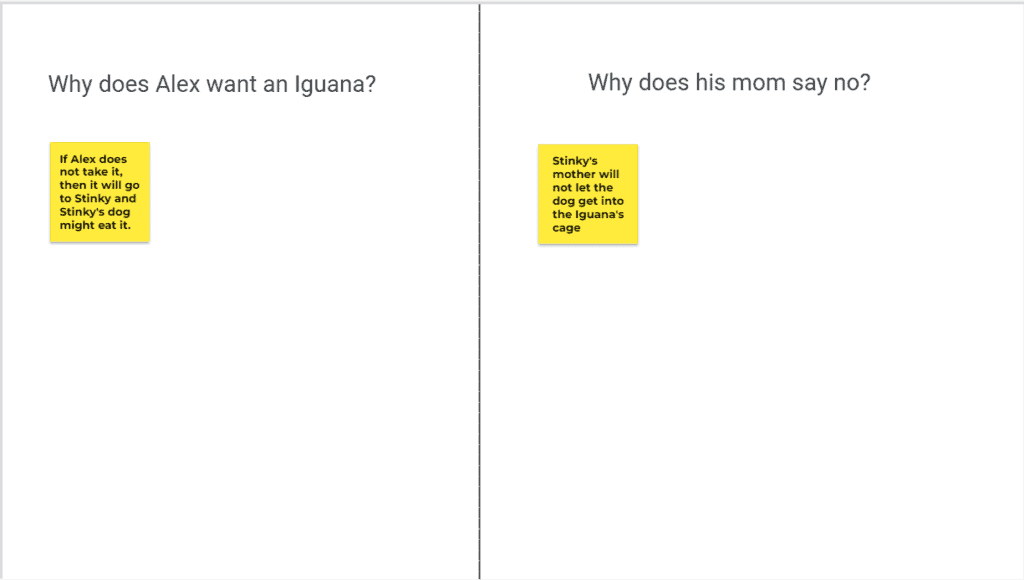
Whether it is to automatically grade assessments, create a choose your own adventure quiz, creating surveys, or anything in between, Google Forms is just the tool. I have used Google Forms briefly in the past; however, through this assignment, I was able to create a space assessment and an interactive choose your own adventure quiz! This lesson displays how I used Google Forms for a first grade science lesson regarding “Earth’s Place in Space.” The assessment gives the students automatic feedback for if they got the answer right or wrong, which is very helpful. Similarly, students can explore different routes in the choose your own adventure quiz to get different answers/adventures! Google Forms will be a helpful tool to use more in the future.

Adobe Express

This lesson was used as an example of how someone could use Adobe Express in the future. In my future classroom, I would love to have students create their own poem or website that showcases their “home” much like this one. Similarly, this is a unique poem that I could show my students so they have a better understanding of who I am as a person. Many times students forget that teachers are real people, too. By allowing students to see a more vulnerable side of myself, through the form of a poem, they would have a better grasp of who I am. This lesson could also be adapted for many different projects such as projects about different habitats, the plant life cycle, etc.

Book Creator

I created a book called “All about Digraphs!” which discusses the different digraphs “sh,” “ph,” “th,” and “ch” and their personality traits. Book Creator allows the designer to do voiceovers, which would be helpful for reading to the students, and in my case, recording the sounds that the digraphs make. This particular book gives students ample opportunities to practice digraphs as each digraph page primarily uses words with the respective digraph. This would be a fun and engaging way to help primary students practice reading and understanding digraphs. I would love to use Book Creator in the future as well because I feel as though students would enjoy books specifically made by their teacher. This would also be fun to have students create their own books for a project!

Google Sites

This collaborative lesson was an exciting one. Marlee and I created a website that would be useful to share with parents and students in the class. The website showcased me as the teacher and described my hobbies and interests. This also serves as an example of what the students page on the website might look like. The website also includes multiple resources regarding where the school is, classroom materials, classroom technology, etc. Google Sites can be used to create subject based lessons or classroom materials, such as mine! I look forward to creating more sites in the future.

Conclusion

Overall, I have come to the realization of how helpful technology is within the classroom setting. I plan to incorporate all of these tools into my own classroom in the future and I look forward to having my students make projects on these platforms, as well. Instead of discouraging technology in the classroom, there are so many ways that it can be useful, creative, and interactive, all at the same time.

Ms. Onishi’s Technological Advancements

I would say that I am at the average skill level when it comes to technology. I can figure out where the nearest gas station is on Google and I can type an essay using Microsoft Word. This semester has opened my eyes to a whole world of technological tools that I did not know existed and assist me so much in creating fun and effective lessons. The WordPress posts I have featured below are just a few posts that I am the most proud of, found the most useful, and will definitely be taking with me into my future teaching journey.

Book Creator

Books are a huge part in any classroom, discovering this online tool where not only I, but my future students as well, can write and publish our own stories. I am very proud of this lesson because I was able to take a concrete topic (in this case, the planets), and give it life to teach it in a far more fun and engaging way rather than the typical lecture and test. This lesson displays the way I would like to take content and turn it on its head to better interest my future students.

Jamboard

I had previous Jamboard experience from classes here at the University of Portland, but this lesson contains the first one I have ever made myself. Taking a blank slate and turning it into a learning tool is probably one of the most intimidating things ever, yet I was able to do it. I loved how this Jamboard turned out as I was able to use it as both a testing tool, as well as an answer key. This lesson allows students to do some independent work and self-correct if they need to.

Google Maps

The technology we learned about this semester was very good for creating lessons for students, but I wanted to figure out how to use some of them to build community in and out of the class. I was glad to be able to create this hypothetical scenario of bringing students on a field trip and sharing this map with parents so that they are informed of everything that is going on and when. Technology can be a huge help in building community, especially in this day and age where everyone is so busy with their crazy schedules and a quick email with information is all that we can do.

Video (YouTube)

This lesson was a bit more simple, I recorded myself reading a book. Yup, that’s it! I included this lesson because I think it is so important to understand that using technology does not have to be complicated and flashy, and that tools can be simple and still have the same effect on student learning. A simple video like this can save teachers the time and effort during class, other teachers at different schools or even different states, but can also be available to parents and families after class, all over the world.

The End of the Tech Road

Photo by Lubo Minar on Unsplash

This semester I have learned and gained so much knowledge on different ways a teacher can use technology in the classroom. This class helped me create a subtle and seamless way to use technology with lessons and base lessons around technology. I have seen firsthand how easy it is to develop lessons that use technology. I am excited to see how I can use it in the classroom next year.

First I started off with a post that was a…

Letter to My Future (Teaching) Self!

This post started me off with learning how to use simple elements of EdTech. Without this lesson, I do not think I would have such confidence in my portfolio that I feel I have now. Having time to transition into such a strange approach to a class was much needed. I am quite a hands-on learner myself, so creating said post helped me build up my skills with the application in the end.

From there I started to create more technical posts like…

Persuasive Brainstorming!

Here we really started to strategize on how we can use technology as activities within lessons. With this lesson, students would be asked to create a slide on a Google Jamboard and develop ideas that they could use to write a persuasive letter/essay later on in the unit. This would also be an amazing way for students to easily provide peer feedback on their ideas and build their own inspirations from other students’ ideas if all is accessible on one Jamboard.

Next, I developed…

Life Cycle of a Butterfly!

What is great about this post was the fact each group was able to explore more technological tools that the internet can provide. For example, PBS Learning Media provided Kaelyn and me with a great online lesson! Here students can interact all in one place from the beginning, middle, and end of the lesson. It also was great because it provided which state standards it met so you knew exactly how applicable this lesson is to your overall school year.

After looking at the lifecycle of butterflies, I made a final post on…

Foods from Around the World!

I felt like I built a strong and engaging lesson on learning about cultural dishes in one’s country of origin. It was also nice to show how a teacher can incorporate multiple different technological applications to help build a lesson. Having the brainstorming and finishing with a presentable book for other students to read and learn from rather than the average PowerPoint presentation.

The Approach to Teaching Tech:

For myself, technology should be more of a helping hand rather than the end-all, be-all of teaching. I have enjoyed finding subtle ways to implement technology into the classroom rather than making whole lessons around a single product like Adobe, Google Drive, or BookCreator. Having small things here and there, like an exit ticket using Google Forms or a brainstorm that is worked on Google Jamboard. While it was interesting to find a lesson like that of the Life Cycle of the Butterfly, it does not feel natural to use in an in-person classroom setting.

What Have I Learned:

I have learned so much from this course. Most importantly, I have found my method of involving technology in my future classroom. Because of this signature way, I have been able to see how accessible it can be for students and peers alike. With technology, more group work can be done asynchronously and feedback can be almost immediate. Technology can support many students, they are able to take lessons at their own speed and be creative in their approach to growing their understanding.

The Digital Journey of A Future Teacher

Technology is something that pervades nearly every part of our lives, including the realm of education. This statement has never been more true after the pandemic hit, forcing schools to take a near completely online format for over a year. It was a tough experience for teachers, but it was fascinating to discover all the digital tools that made the transition easier. A lot of these tools are still being used in in-person classrooms because they have the ability to enhance the learning experience whether it be in an online or in-person format. I am grateful that I had the opportunity in this course to learn about these tools and practice applying them to lessons and activities. Here are a few of my favorite posts from WordPress I made using these tools.

Figurative Language Lesson using Jamboard

In this lesson, I had students use Jamboard as a platform to post their own examples of figurative language based on the images on each slide. I enjoyed the way every student can give their input (it helps that it is done anonymously so no one feels ashamed if they’re not confident with their answers, although this does make it hard to attach accountability to individual students) and can see the examples of their peers. Plus, it was really easy to set up!

Solar System Scavenger Hunt Using Google Sites

In this lesson, Kate Marshall and I created a website that students would explore and use to fill out a scavenger hunt worksheet. I really enjoyed this activity because it allows students to work at their pace and offers them a great resource they can look back on whenever they need to. I also enjoyed how the activity encourages students to focus on specific details about all the different planets in a fun way without shoving a bunch of random facts into their brains.

Ahupua’a System Lesson using WordPress

This post definitely took me the longest out of all of the posts I’ve made. But the hard work paid off because I’m really proud of it looking back! I like how the lesson can be done by students whenever and wherever because the instructions are all there in the post and directed toward students. Similar to what I said earlier, this online lesson allows kids to go at their own pace and isn’t too demanding or complicated for them to do independently.

Conclusion

After learning and applying so many skills and digital tools throughout this course, I feel much more confident heading into the classroom in a couple of years. However, there’s always more to learn about, and I think another important thing that this course has offered is openness to trying new things. Some tools aren’t that easy to learn and we as educators need to be receptive and willing to put in the work to learn how to use them in the classroom.

Thank you so much for checking out my portfolio! I hope you enjoy my posts.

Featured Image: Photo by Compare Fibre on Unsplash

All About Agricultire!

Target: 5th grade science!

Standard: 5-ESS3-1. Obtain and combine information about ways individual communities use science ideas to protect the Earth’s resources and environment.

  • Human activities in agriculture, industry and everyday life have had major effects on the land, vegetation, streams, ocean, air, and even outer space. But individuals and communities are doing things to help protect Earth’s resources and environments.

Direct Link to Book

Instructions:

This lesson is the first in a unit all about human impact on the environment! This first lesson is specifically about human impact on our land. Once the teacher introduces the goals for the lesson, they will allow students access to this interactive science notebook that all students will download as a copy to edit! The teacher will provide students time to start working on steps 1-4 independently. When all students are ready to move to step 5, the teacher will begin the apple demonstration and students will fill in the pie chart! Once the demonstration is over, students will collaborate to answer step 5. Once all students finish and the time is up, students will complete an exit ticket by answering the question on the last page!

Instructional goal:

While completing this lesson, I want students to have a clear spot for all of their information and an example of what a clear, concise notebook should look like. I want students to be able to independently follow the steps and work on steps 1-4 by themselves (unless they have specific needs where this cannot happen – then the teacher will create an alternate plan where they can work with one buddy). Students should be able to take notes, create a hypothesis, and be critical thinkers!

Why BookCreator?

I really loved learning how to use BookCreator this semester. In my current field experience class, I notice that students do a lot of work (note-taking, assignments, etc.) on various apps, but it is all so inconsistent and disorganized. I also notice that the students really struggle to format all of the things that they need to do in a way that is helpful for them in the future to look back on, or even to complete later. I chose to use BookCreator to create a science journal for students so that they have a clear place to put all of their work, and everything that we do that day is all there for them. I think that this is also great because it provides a lot of resources for students who are absent that day, and the teacher only has to show a video of the apple demonstration to them and alter the group conversation. I love how you can embed different materials into this website so that the teacher does not have to scramble to print out and pass out tons of worksheets!

Let’s Rock with the Rock Cycle!

Grade level: 4th-5th grade

Subject: Physical science

Goal: Students will be able to identify the three types of rocks and how they are formed. Then they will learn how the different formation processes are connected in the rock cycle.

Introduction

Start off the lesson by sharing this Jamboard with the class. This will act as an introduction to the lesson topic, exploring the questions:

  • What are rocks?
  • What are some characteristics of rocks you have seen?
  • Where do rocks come from?

Here are some examples of student responses to these questions:

This introduction can be as brief or long as you would like. Feel free to start a class discussion on these responses if there is time available.

Video

Have students watch the video below that offers a brief description of each type of rock and explains the stages of the rock cycle.

Identifying the Stages of the Rock Cycle

After watching the video, have students work individually on this Google Drawing. Instruct students to fill in the blanks of the rock cycle by dragging the appropriate terms to the boxes.

Create a Website

After discussing the answers to the Google Drawing worksheet, place students into groups of 3. In their groups, they will be creating a website using Google Sites on one of the three types of rocks. It is up to you if you would like to assign the rock types to the groups or have them choose which one they’d like to work on. They will need to conduct research on the rock type and organize the information they find on the site. The website should include:

  • How the rock type forms
  • Common characteristics of the rock type
  • Examples of rocks in that rock type
  • Sources/Work cited page

Here is an example of a student made website:

Debrief on Technological Tools

In the beginning of the lesson, the Jamboard that was used as an introduction allows students to offer their opinions and thoughts in a more accessible and efficient way. It’s also a great way to document everyone’s opinions compared to forming a discussion based on raising hands and calling upon a limited number of individual students.

The Youtube video is helpful for explaining concepts in a concise and visual way. The teacher can also make it accessible on Google Classroom or another class resource site so students who didn’t understand the first time watching or students who were absent can go back and rewatch it.

The Google Drawing was used for students to put their knowledge to the test and label the rock cycle. Doing this digitally prevents the need for printing copies of a worksheet or handing it out during the lesson. And if students make mistakes in their answers, the Google Drawing allows them to easily make changes by simply dragging the terms into the correct boxes rather than erasing and rewriting.

The Google site is a great way for students to organize information. It allows them to add pictures and work together with ease since they can work on the site on their own computer at the same time. The site can easily be shared with others to look at whenever they want.

Featured image: Photo by Oliver Paaske on Unsplash

Ms. Kato’s Technology Portfolio: A Trip Down Memory Lane

Image by Monica Sedra on Unsplash

During this last semester, I have learned so many new ways to incorporate technology into my teaching. It has helped me with being more creative in the way I come up with new lesson ideas for my future students. This ED 424 class is such a valuable course in relation to my future as an educator, and has even helped me grow with personal use of technology as well! Looking back on this year, my view on technology in the classroom has changed quite a bit. I now see how valuable technology truly is in the classroom and the many benefits it can have on our students. Below are just some of the ways I have integrated technology into my teaching practice!

Use WordPress to create a fun Math activity!

A fun lesson for Kindergarten Math. Learn about numbers and practice counting by looking at different pictures!

Use Google Jamboard as an exit ticket!

This exit ticket is all about phonics. A great way for students to demonstrate their understanding after a lesson is taught.

Use Edpuzzle to create an interactive video!

I created this Edpuzzle for students to learn and identify solid shapes and their features!

Use BookCreator to make a book to read to your students!

Take a look at the book I created using BookCreator to learn about Sneaky Silent ‘e’ and all of the adventures they take us on!

Ways I want to implement technology in my future classroom:

  • Create a Google Site as a ‘meet and greet’ for students and parents
  • Find fun ways to incorporate technology in everyday routines
  • Experiment with new technology outlets and discover new tools to use in the classroom!

My Technology Journey- Shaping the Next Generation

Photo by Robo Wunderkind on Unsplash

Here are some of my favorite posts that I created over the semester! Technology in the classroom is important to have because with these new generations, kids are so good at using their IPads, IPhones, and much more. Kids are so creative and with these different technology resources they are able to apply their creativity and knowledge through their work! Now that I have been introduced to so many great technology resources, I can’t wait to incorporate them into my future classroom!

Here is my first post of the semester! I learned how to use gifs, embed youtube/tiktok videos, and images! This post explains why I would like to become a teacher and who my inspiration is!
In this post, I used Jamboard which is a great technology resource that you may want to consider using in your own classroom. This tool is easy to use and allows students to collaborate together!
This post showcases the many ways we can use google forms! You can use this tool as a self-graded quiz to see where your students are at with the materials they have been learning in class! There is also the option to make a branching form that I never knew existed! Check it out!
In this post, I used an Edpuzzle video, I was able to choose what grade and content I wanted to focus on and the best part is there are certain places in the video that pauses to ask the viewer a questioner to make sure they understand the concept! I will definitely be using this when I become a future educator!
We explored MyMaps and I was able to create a map of the school that I attended back on Oahu! This tool can work as a campus tour or even places you have traveled around the world!
Hailey and I created a google site on identifying our emotions! Students would have access to all of the content on the website and be able to have multiple resources available to them!
This was my last post for the semester and the one I am most proud of! I used BookCreator to create a book of my own that introduces the topic of weather! This tool was great and easy to use as I was able to come up with my own story that my students would understand.
Photo by Howie R on Unsplash

Writing and Revising Opinion Pieces

Opinion picture by Steve Johnson on Unsplash

This lesson is for second-grade students to practice forming, defending, revising, and publishing their opinions in writing.

Standards:

CCSS.ELA-LITERACY.W.2.1
Write opinion pieces in which they introduce the topic or book they are writing about, state an opinion, supply reasons that support the opinion, use linking words (e.g., because, and, also) to connect opinion and reasons, and provide a concluding statement or section.

CCSS.ELA-LITERACY.W.2.5
With guidance and support from adults and peers, focus on a topic and strengthen writing as needed by revising and editing.

CCSS.ELA-LITERACY.W.2.6
With guidance and support from adults, use a variety of digital tools to produce and publish writing, including in collaboration with peers.

First, the teacher will read aloud a text on opinions. In order to highlight how the letters communicate effective option pieces on why Alex believes he should get an Iguana and why his mom believes he should not have one, students will collaboratively fill out the following Jamboard to find opinion piece tools.

A few other options for opinion picture books include:

  • I Will Never Not Ever Eat a Tomato
  • I Don’t Want to be a Frog
  • The Day the Crayons Quit
  • The True Story of the Three Little Pigs
  • The Perfect Pet
  • Don’t Let the Pigeon Drive the Bus
  • Click, Clack, Moo Cows that Type

Then, students will fill out the following Google Form to see where they stand on statements and start generating ideas on what they would like to write their opinion piece on. Students will rate their opinion on a 1 to 5 scale of strongly disagree or strongly agree. Places, where they mark either a 1 or a 5, are places where they are encouraged to write about (or pick their own opinion statement to work on). The Form’s questions are not meant to be a comprehensive list of opinions to write on, but rather a starting point for students to pick what is important to them.

Then, students will work with Google Docs to write their first draft of their opinion piece. Clicking on the Google Doc below will have students make a copy of the page so each student is able to edit and add their work for their first draft. Students should use the example sentence starters/ transitions gathered on the Jamboard or ones that the teacher will present below:

Example sentence starters:

  • I feel…
  • I think…
  • I belive…
  • I think ______ is better than _____.
  • The worst part about _____ is _______.
  • The best part about _____ is ______.

Example transitions:

  • First,
  • Next,
  • For example,
  • Most importantly,
  • Additionally,
  • For instance,
  • In other words,
  • In conclusion,
  • Finally,
  • To summarize


Then, students will share their work with another student in the class via Google Docs who will peer edit their work to ensure their argument and evidence are clear and convincing.

Finally, students will publish their piece on Book Creator making sure that they have a page with their topic sentence, a page per piece of evidence, and one for their conclusion with any pictures, videos, or drawings they prefer to back up their claim.

See the source image

Addition Adventures

When teaching students addition, these forms can help guide their learning experience. The pre-assessment can show which students may need more support and potentially help show which strategies may help each student succeed in addition. The branching assessment can help students explore the different addition strategies and teach them multiple ways to approach an addition problem.

Teaching with Tech

Looking Towards the Future with a First Grade Lens

Photo by Compare Fibre on Unsplash

As I mentioned in one of my early posts this semester, I have a love/hate relationship with technology. But the thing is, educational technology is an inevitable part of being a 21st century teacher. That means I need to be adaptable, open-minded, and willing to use technology in my classroom. This semester, I have learned so much about different tools I can weave into my classroom. I’ve practiced using these tools while also seeing ideas from my fellow future teachers. I have grown more open to the idea of incorporating new technology in the classroom because I now know how capable I am of learning new technologies even if the learning curve might scare me at first. Technology not only can, but should be incorporated in the classroom!

Whenever anyone asks what my ideal grade to teach is, I say kindergarten through 2nd grade. More specifically, I have grown to love 1st graders and this is the age I have requested for student teaching next year. This whole semester, I have been working with 1st graders at Alameda Elementary for my field experience and it has been wonderful watching them grow academically, socially, and emotionally. Therefore, I made it a point to create many lessons with a 1st grade lens, which are featured below. Hopefully I’ll be placed in a 1st grade classroom next year and can try out some of these technology-infused lessons!

Grow grow GROW butterflies

This “grow grow grow butterflies” lesson guides students through the butterfly life cycle by following a group of butterfly eggs as they grow into butterflies. The Google site gives them a home base for this unit, teaching them about the life cycle of a butterfly and giving them access to all the links needed to engage with the content.