The End of The Beginning

We are finally at the finish line.  I got to say, this race was the longest one yet.

Looking back on my first post,  I only talked about how I used technology, or the current technology I had, in education, but not anything pertaining to what I wanted to get out of the class.  I am kind of glad I did that because it feels like I was telling myself that I wanted to keep things a mystery with no expectations so I can see every lesson with interest and not be disappointed if something I wanted to learn never came up.

Have I made progress?  Hell yeah I did!  This class unlocked so many new ways to teach that I can now use.  I know they were always there in some way or form, but I just needed some kind of force to show me that they existed.  I will most likely use everything I have learned in the future, but I believe I would find myself using the “Find, Curate, Store” and “Screencast” lessons the most.

Suggestions?  In terms of improving the class, there is nothing I can think of.  I’ve enjoyed the project-based learning, meaning that it was up to us how invested we wanted to be in the lesson and the work.  Every lesson was detailed enough that we were able to learn on our own, allowing you to walk around the class to see our progress/struggles and lending your assistance to us.  In terms of new things to teach, I’m sorry, but I can’t think of anything.  Everything in this class was new to me and found them useful and fun.

Thanks, Peter!

Featured Image: Adobe Spark Creation

Sci-Notting the World Counters

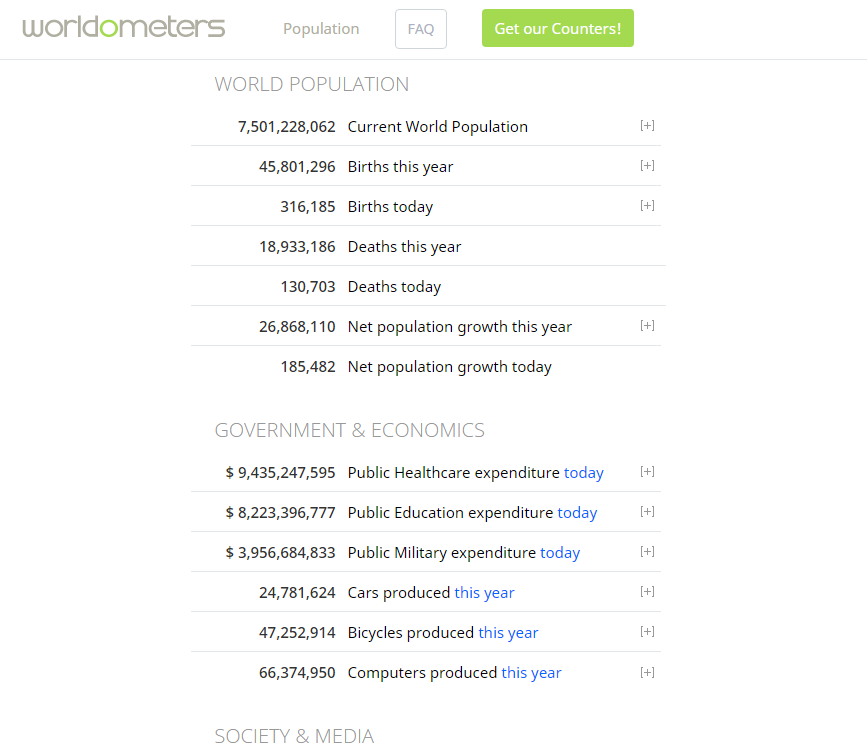
What you see above is a sample of what you would see if you went to World-O-Meters.  As you scroll around the page, you will see many different topics like military spending, agriculture, water usage, production of electronics, social media, and so on.  This site is a giant world counter.  It is not entirely accurate, but a lot of math and trend observations went into making this as accurate as possible.  And this site is perfect for introducing and teaching scientific notation.

Prior Knowledge Needed:  Exponent Rules

Lesson Begins:

So, what is scientific notation?  In layman terms, scientific notation is the way of writing very large or very small numbers in a more compacted and readable version.  Writing or typing, it is still quite tedious to write/type a number like 123456789086432477043146.  Scientific notation allows us to rewrite this in a compacted form and we could probably round off somewhere since most of the numbers are useless.  Though, if you are in the science and medicinal fields, those numbers are important, but it would be a hassle to write all those commas.

Day 1:

Introduce World-o-Meters and have them explore the site a bit on their electronic devices (Chromebooks, iPads, phones, etc.).

Introduce the concept of scientific notation.  Ask if students know what it is since they may or may not have encountered the concept already in their Science class.  Most common reply would be “It’s a way to make writing big numbers easier“.  If there are students who never heard of scientific notation or need a refresher, do some examples on the board like 16,000 and ask them to turn it into scientific notation.  Answer:  1.6 x 10^4.  Just remember that the decimal point has to go behind the first nonzero number or the number in front of the decimal point has to be greater than 0 and less than 10 (0 < n < 10).

After that, spend the rest of class having the students practice writing topics of interest in World-o-Meters in scientific notation and then turning it back into standard notation (1.6 x 10^4 = 16,000).  I suggest having students switch papers and practice writing their peers’ answers in standard notation.  If you have time introduce the concept of negative exponents in scientific notation.

Day 2

Bring back World-o-Meters and begin class by stating that now that we can write in scientific notation, we can now use scientific notation to compare the date behind us.  Like life vs death, emails sent vs tweets, car production vs bicycle production, and so on.  And we can compare these topics by using multiplication and division with scientific notation.

Before letting them go choose what topics they want to compare, go over the how we can multiply and divide in scientific notation.  I suggest that you put an example on the board like 5.2 x 10^2 x 2.1 x 10^2 and having them explore that with their peers.  They should find out that they should multiply or divide the front numbers and add or subtract the exponents respectively.

After that is written in their notebooks, they are free to go onto World-o-Meters and explore possible comparisons in the world.  They would have to convert the number into scientific notation before they can multiply or divide accordingly.  I recommend that the students round the numbers to the nearest thousandth for easier writing.  Just remember that for n.6539174:  0 < n < 10.

After students have their comparisons, have them come up and share because it would be interesting what students thought they could compare.  Just look if they multiplied (add) or divided (subtract) correctly.

That’s all for now.  I’ve actually experienced this lesson in one of my classes and thought it be cool to keep.

Featured Image:  Colored World Map

Create the Wheel of Your Desire!

The intent of this mathematical activity is to have the students apply the Pythagorean Theorem and to show off their creative sides.  By this time, students would have discovered the Pythagorean Theorem (a^2 + b^2 = c^2) and that the theorem only works for right triangles.

The students will be using this knowledge to draw and label a nautilus-looking wheel titled the Wheel of Theodorus.  Explanation is in the link to the activity below.  While students are drawing their right triangles and thinking of what they want to draw using their wheel, they are applying the Pythagorean Theorem by labeling the sides of the triangles (legs and hypotenuse ← they have to use the theorem to find this guy) and labeling the right angles in each triangle.

That’s about it.  Short and Simple. Why not give it a try? Click on the link below to see the instructions to start making a Wheel of Theodorus of your own.  Have fun!!

The Wheel of Theodorus Activity

Featured Image: Jeremy’s Own Wheel (taken from camera)

Getting To Know You All Starts From The Basics

Learning Objectives:

  • My main objective is to assess where my students are in terms of their mathematical skills since students coming into the classroom are on a variety of levels when it comes to their academic skills.
  • I want the students to be able to gauge themselves on their academic capabilities and learn that it is okay to make mistakes and that sometimes asking for help from a peer or teacher will always be the best choice to make in my class.
  • I need to free up class time so I can register students onto WordPress (or some equivalent like Edmodo) accounts so we can do online help forums on the various units we will be covering in the year.

Digital Resource(s) I will be using for the lesson:

  • I will be using a WordPress blog post with a multitude of links titled with mathematical concepts that will lead students to online worksheets to practice on.
    • Examples:  Addition and Subtraction,  Multiplication and DivisionLong Division, and so on. *I just underlined them so they are not actual links*
  • The list will go on up until the last concept we will be covering in the year.  A lot of the students may give up before that point since they have yet to learn these concepts, but some will give it a try.
  • Each “worksheet” will contain around 5 – 10 problems each.  3 – 5 if they are word problems.

Active Learning Strategies

  • Students will be gauging themselves on how well they are able to do the following concepts.  The quicker, the farther.  They will have a huge confidence boost at the beginning since the work will be “easy” for them, but the challenge will slowly rise as they continue.
  • Students will be able to work with fellow peers on problems they are unable to get passed, establishing that teamwork and group work strategies will be used in the classroom.
  • Once I have finished with setting up the WordPress accounts with the students individually, I am then able to walk around the classroom and interact with the students.  Getting to know and/or answering any of their lesson specific questions.

How the digital resource integrates into other instructional elements of lesson – what’s the flow of the lesson?

  • The flow of the lesson is quite free form.  On my WordPress blog post, all the students will see is a bunch of math concept titles that they are able to click on that will send them to a worksheet with problems related to the title.  They do not necessarily have to go in order (top to bottom), though I feel like some students will do that.  If students are comfortable enough with the concept/skill, they are allowed to “skip” on clicking that link and move onto another that perhaps will provide a challenge  to them or that will allow them to revisit a concept/skill they are not strong in and practice.  Students are allowed to ask others for help, but only after they have given the problem an honest-to-God attempt.

Benefits for student content mastery, collaboration or learning workflow – Why is it worth it flip / blend some of the content?

  • I believe it is worth it to doing this because the students (most of them at least) will see that they have learned many things in their academic journey and that they are able to do them all and are going to learn more concepts to add to that repertoire of theirs.
  • Hopefully, the students will see that math skills build upon themselves and what they are doing is adding tips and tricks to those skills.  It is an important skill to be able to do math problems on pen and paper since the work will be saved “eternally”, or until one throws it away, that can be used to check back in and refresh oneself, to have others check your work more visually and easily, and as physical evidence to the teacher that one is doing the work.
  • I also see this lesson as a practical lesson on the expectations of the class surrounding teamwork, behavior, and conduct in my classroom.

Featured Image:  Mathematics Title

Stuck in a Slope? Let’s Find a Way to Intercept That and Get Out.

So, in the video below, I recorded a mini-review about the parts of y = mx + b, or slope-intercept form.  What I hope to achieve here is that people who watch it can get a better understanding of what and  are asking for when they look at y = mx + b.  I also hope for them to be able to plug the slope ( m ) and y-intercept ( b ) correctly into the formula if given those numbers and/or be able to tell which is the slope and which is the y-intercept if given the formula, like y = 4x – 5 for example.  In this case, they would find that m = 4 and b = -5.

After learning and messing around a bit with screencasting, I saw some benefits and a few struggles, but that can easily be overcome with perseverance and determination.  I am also very happy to finally figure out how those people on YouTube do those “How-To” videos that involve going from screen to screen.  Always thought that those people had a really good recording camera that was set up on some sort of amazing tripod and they created the video from there.

Anyways, the biggest benefit I can see is that screencasting can be very useful in filling in any holes that a lesson(s) could have had since, as we know, class time can be quite short (55 – 90 mins) and that not everything can be covered in that span of time.   Another benefit is that after the video is made, it is now a semi-permanent resource that can be accessed by one’s current students and future students if one was to teach the same lesson again.  Another benefit is that the application is easy and free to use (as far as I know) that one does not have to buy much equipment (except maybe a microphone).

The struggles I found are just some personal struggles that I feel like some people share with me.  One struggle is that, even with a script, one can still say too much or too little.  In other words, one can go off-script at times.  Another is that If one is really nit-picky about their recording, then he/she would probably restart every time he/she makes a mistake.  Another struggle is that the “attached” recording equipment can be faulty at times and one would not find out unless they do a test run or until the end, depending on the type of person one is:  “being prepared” or “power on through”.  I would make a new recording for the video down below, but I wanted to show where these struggles can pop up.  And like I said earlier, all of these can be remedied by staying determined and having the motivation to make a good lesson video for one’s students or for the people of the world.

So, I can see myself using this in the future definitely.  It was a lot of fun, though I did not enjoy hearing my own voice coming out of the speakers.  The idea of making these was challenging.  You know, making sure all the basis were covered, my “recording room” was quiet enough to record, my script was a draft of what I wanted to say (Reminder Points), and so on.

Enjoy the video! Hope you learned something or laughed at my mistakes!

Featured Image: Wikimedia

Secured!! The Captured Beauty!!!

Captured! The Beauty of Guam!!

I used Microsoft OneNote to store my collection for this activity.  In my honest opinion, OneNote was the easiest storage-maker(?) to use.  When you open the application, up at the top of the page, in big letters, are the options of what you can do within OneNote.  Insert a picture, take a picture from your camera, insert a link for a video or audio, and so on.  It was just that easy.  I mainly used pictures for my collection though.  Also, it seems if you downloaded any fonts onto your computer to mess around when using Microsoft apps (Word, PowerPoint, Excel, etc.), they are available to you on OneNote.  Sadly, you guys cannot see it unless you have the font in your device too.  But, I will attach a picture of what I was seeing as I made my collection!

Sorry about the quality!  Happens when you take a picture of a screen.  But, yeah, the font is called “Burton’s Nightmare”, which is the font of “The Nightmare Before Christmas”.  Awesome movie!  Recommend watching it then re-watching it every Halloween and Christmas!

I wish I was introduced to this earlier! It is fun and easy to use!  It is not that I am afraid to try new things, but that I am just too comfortable (*lazy*) with stuff I am familiar with.  I already have some pages (note sheets?) saved on OneNote to be used to help me with my student-teaching so we can see that I plan on using this app more in the future and, hopefully, for a long time too.

Featured Image: Island of Guam

The Daily Life of Jeremy Pingul and “Educational” Technology

The EdTech equipment in my classroom are a projector, a document camera, and a Chromebook cart. Other classrooms have the same equipment (except for the Chromebook cart), but some of them are equipped with Smart boards.

Every day, I mainly use the projector and document camera to teach in my classroom. It has been extremely useful in showing everyone where we are at in the lesson (freeze frame), in sharing each other’s works, and in giving more zoomed-in examples to see. The only real difficulty I am currently having is having to line up my documents (worksheets or textbook) with the camera. The camera is set at an angle so that it can fit on the table along with the projector, attached monitor screen, and student “cold-calling” cups. Also, it does not help when the sun’s rays create a glare on the documents that it can be hard to read sometimes.

When I or the students need to write something while in front of the classroom, we would either write on the projected “picture” or on the empty space next to the projection. Writing on the projection gives students a clear example of what is happening next in the lesson, but it can sometimes be tricky to read with the bright lighting of the classroom and the possible glare between white board and projector. Writing on the empty space next to the projection is useful because it is hardly affected by the problems above, but it can be quite tedious in having to switch between pointing at the projection and what is being written.

The Chromebooks are used for class activities such as classwork (ex.: Desmos), Khan Academy, and Coding. The first activity comes up every once in a while when we think that the lesson could benefit from an online classroom. Right now, we have been using Desmos the most. Khan Academy is a classroom activity that we do on the last day of every week (mainly Friday) and we assign targets for the students to achieve and practice what they have learned and are currently learning. You can consider it a class lesson since the students are on it for the entire day. Coding is an elective for all middle-schoolers that my Cooperating Teacher is teaching in 2nd and 3rd Quarter so all of the students in the classroom must have a Chromebook on them to do the work assigned.

Also, the Chromebooks allow the students to see their progress reports and grades throughout the year, which allows them to talk with their teachers about what they are seeing. Mostly about how can they bring up their grades or concerns about how they got the grade they got.

And that is how technology is being used at my placement.


Image Credit: daily routine